Objectives
Here we proceed to explore in detail the creating of a simple activity class + the associated layout. This process will seem quite complex on first contact - but as we proceed through the labs over the next few sessions the deep structure should start to emerge.
Create Project
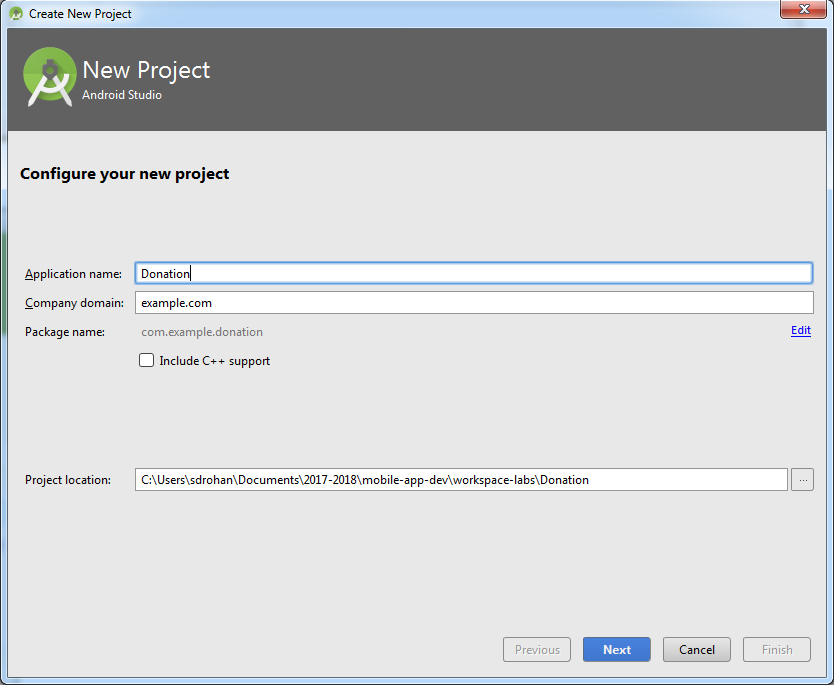
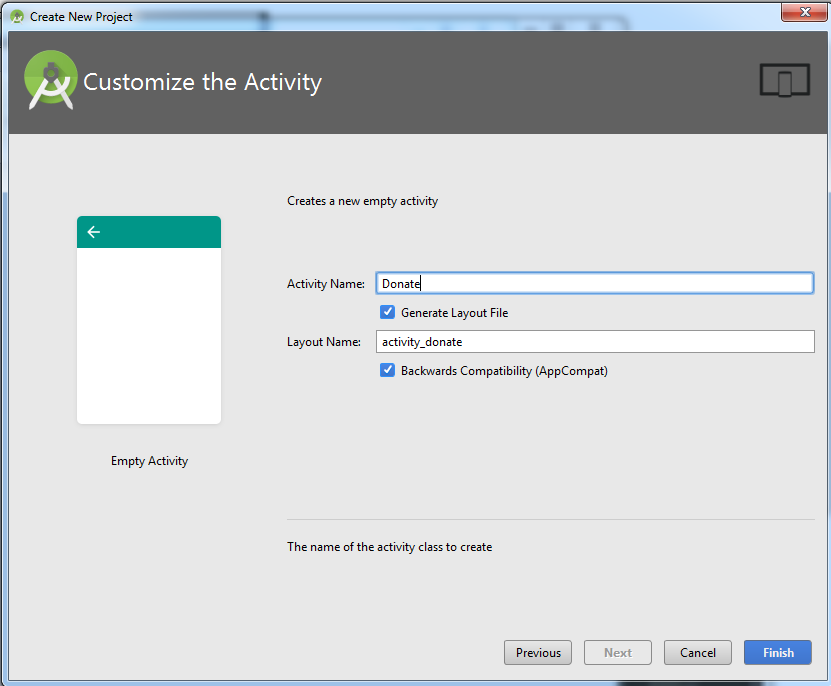
Create a new Android application as demonstrated in the following screenshots. Note that we are using Android Studio V 2.3.1:
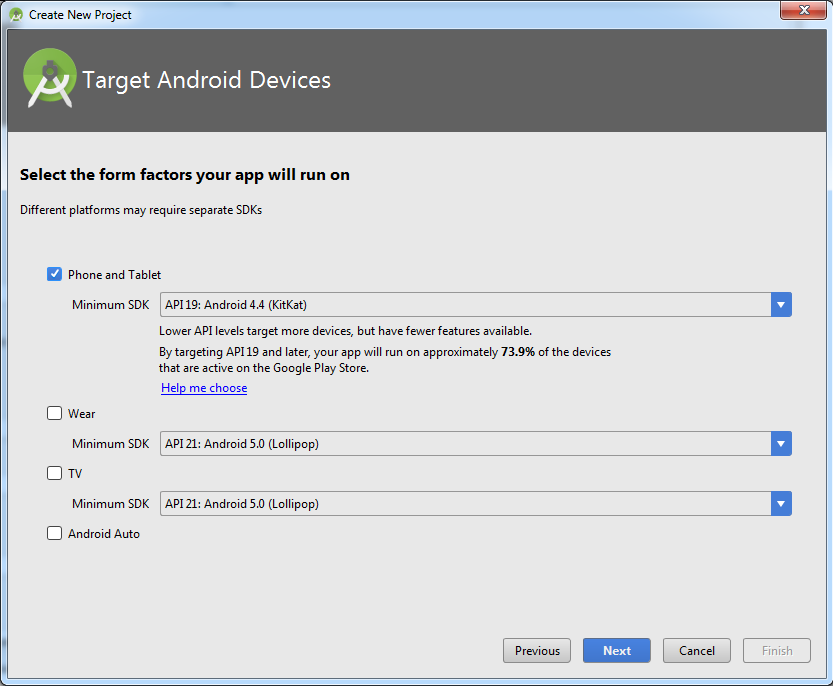
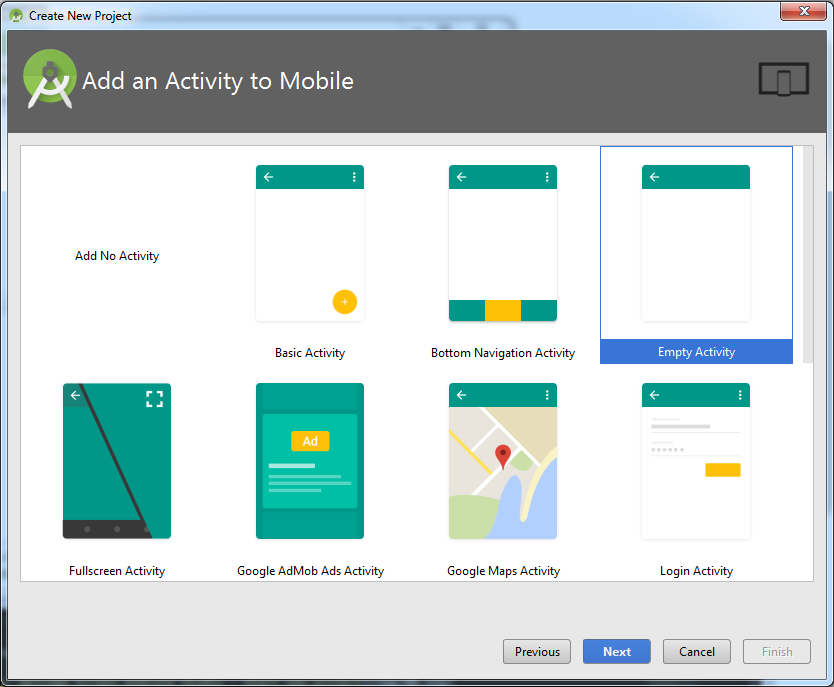
Note the 'Minimum Required SDK' which may be different from the default (Figure 3.1).
The opening project perspective is shown in Figure 6.
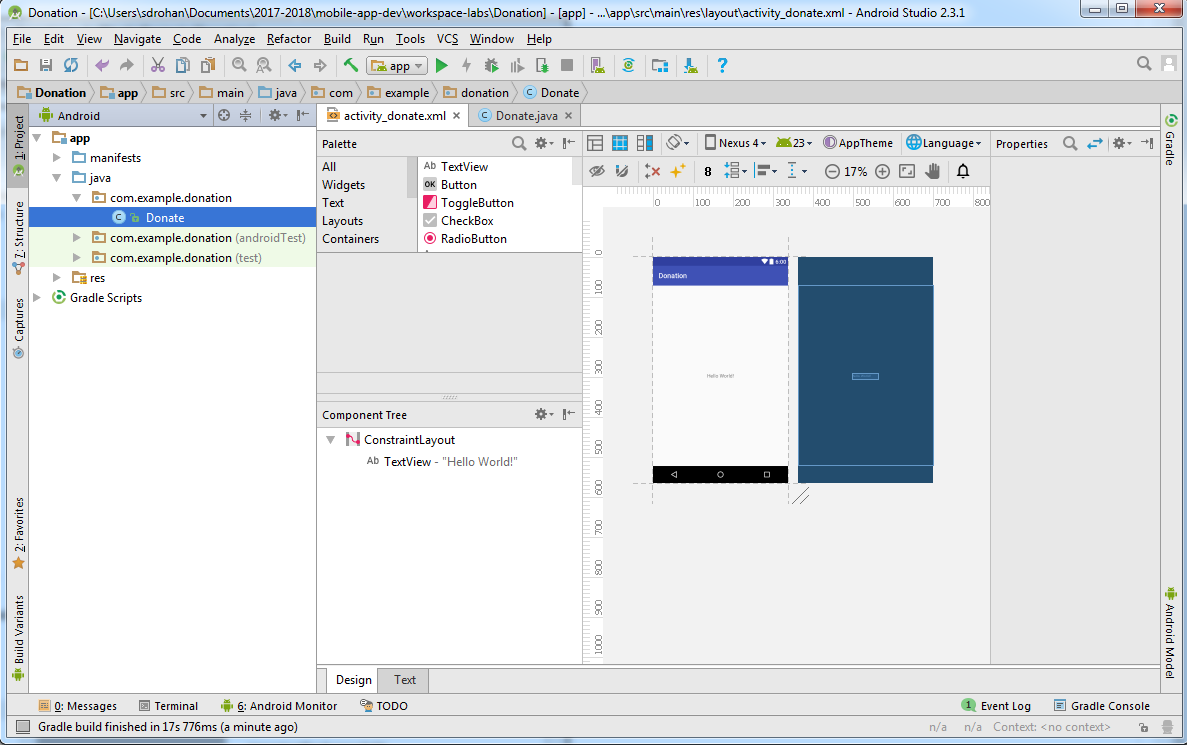
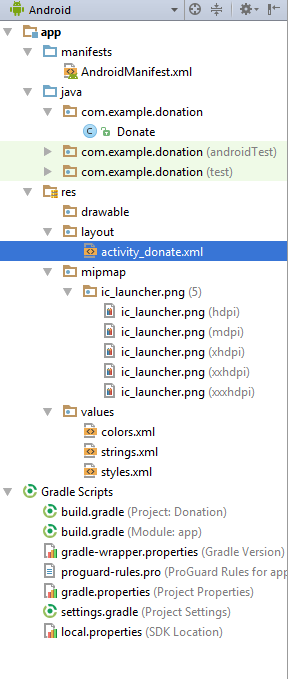
The project will look like this:
Here, the activity_donate.xml file is open in layout view:
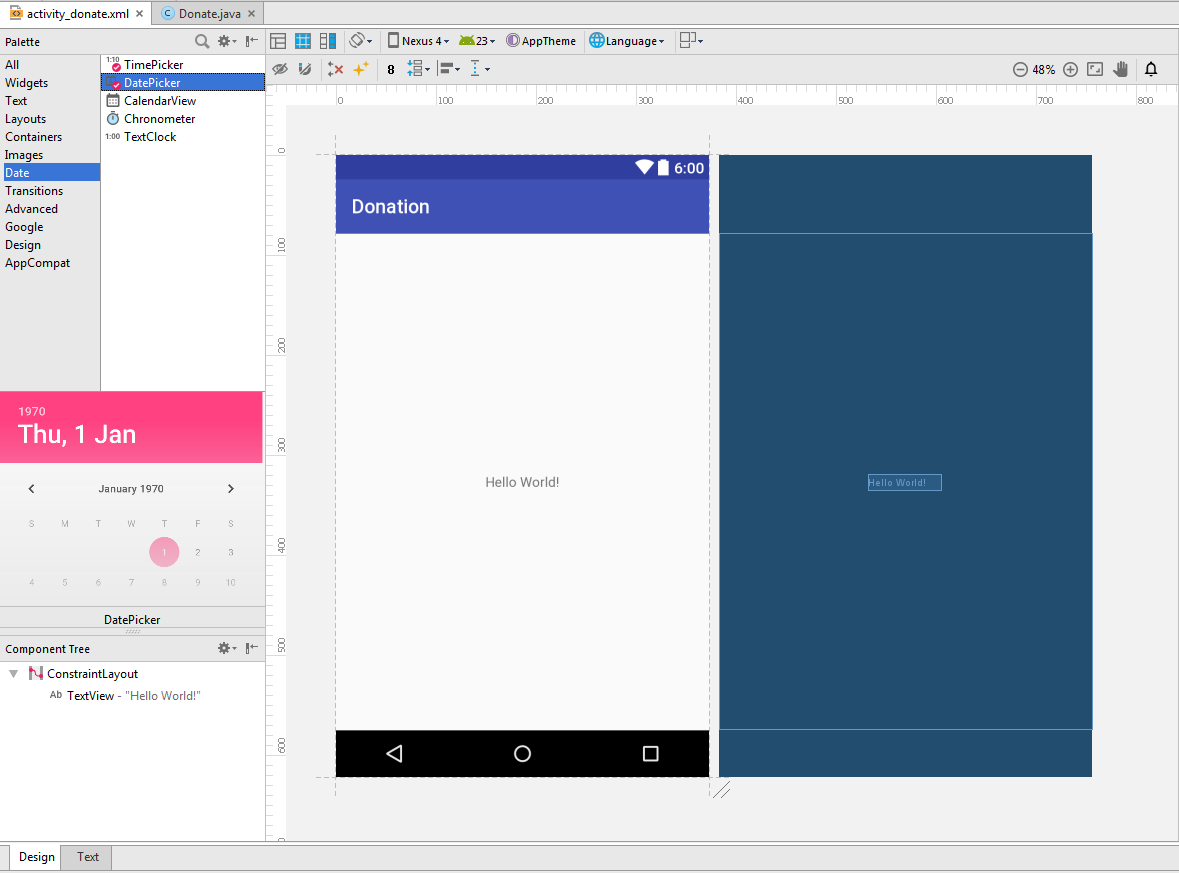
It is important to become familiar with the structure and purpose of the three panes surrounding the Donation 'canvas':
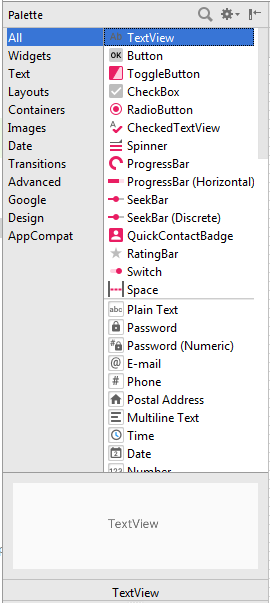
Palette:
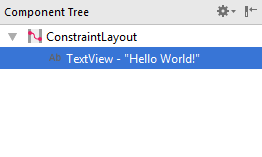
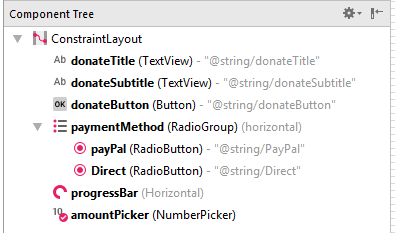
Component Tree (Outline)
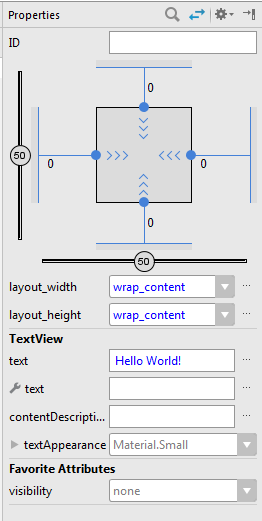
Properties
These views are closely related - and you will need to monitor the information displayed there continually as you evolve the appearance of your activities screens.
Constraint Layout
You may have noticed in the Component Tree (Figure 10 above) that the layout we are using is the ConstraintLayout.
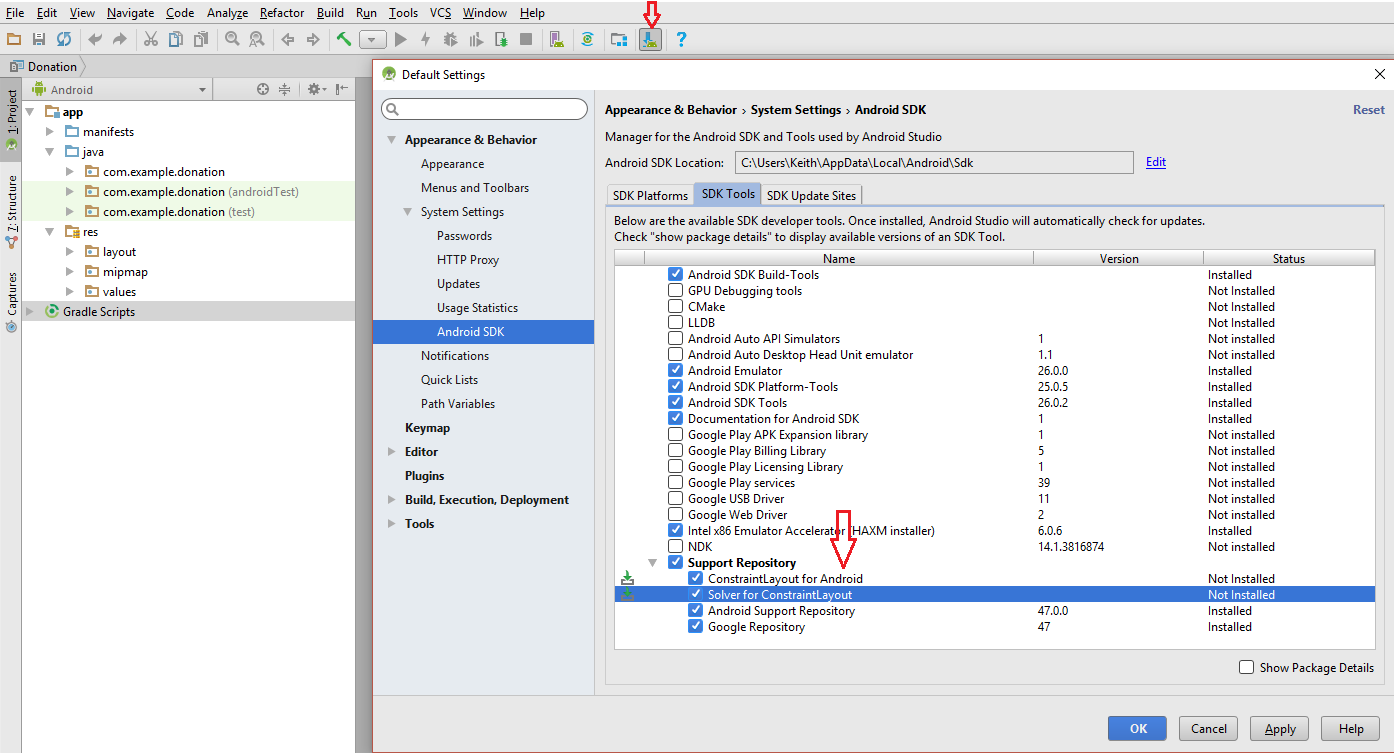
We need to install this developer tool in Android Studio. To do this, open the SDK manager and select both the Constraint Layout for Android and Solver for Android, as illustrated below. click the Apply button.
If we want to use it in our project, we need to make sure that the following dependency:
compile 'com.android.support.constraint:constraint-layout:1.0.2'is in the build.gradle (Module: app) file. If it isn't add it into the dependencies section of this file:
apply plugin: 'com.android.application'

android {
    compileSdkVersion 23
    buildToolsVersion "25.0.2"
    defaultConfig {
        applicationId "com.example.donation"
        minSdkVersion 19
        targetSdkVersion 23
        versionCode 1
        versionName "1.0"
        testInstrumentationRunner "android.support.test.runner.AndroidJUnitRunner"
    }
    buildTypes {
        release {
            minifyEnabled false
            proguardFiles getDefaultProguardFile('proguard-android.txt'), 'proguard-rules.pro'
        }
    }
}

dependencies {
    compile fileTree(dir: 'libs', include: ['*.jar'])
    androidTestCompile('com.android.support.test.espresso:espresso-core:2.2.2', {
        exclude group: 'com.android.support', module: 'support-annotations'
    })
    compile 'com.android.support:appcompat-v7:23.4.0'
    compile 'com.android.support.constraint:constraint-layout:1.0.2'
    testCompile 'junit:junit:4.12'
}
Introduction to the Real Estate of Android Studio's Layout Editor
A good introduction to the layout editor can be found here: https://developer.android.com/studio/write/layout-editor.html. It is highly advisable to read this before moving onto the next step.
Also, you can find more information on constraint layouts here: https://developer.android.com/training/constraint-layout/index.html and in this video https://www.youtube.com/watch?v=XamMbnzI5vE
Layout Donation Activity
For this lab, our objective is to reproduce in Android this feature from the following web app:
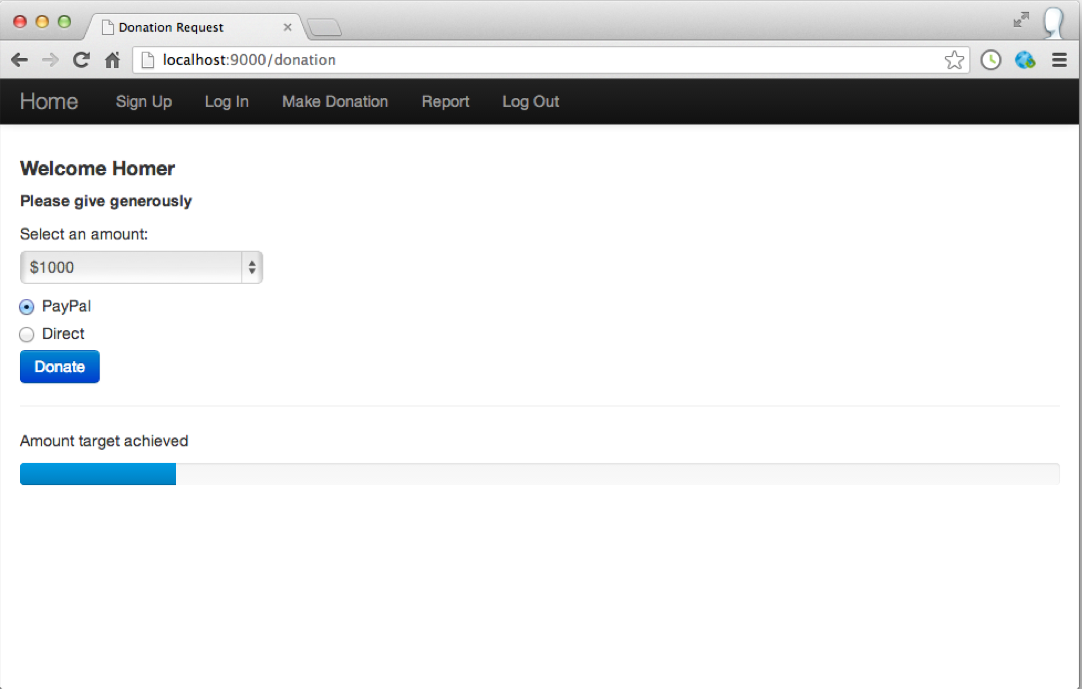
In Android Studio, delete the Hello World TextView.
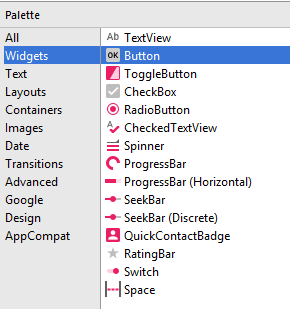
In the Palette, select Widgets.
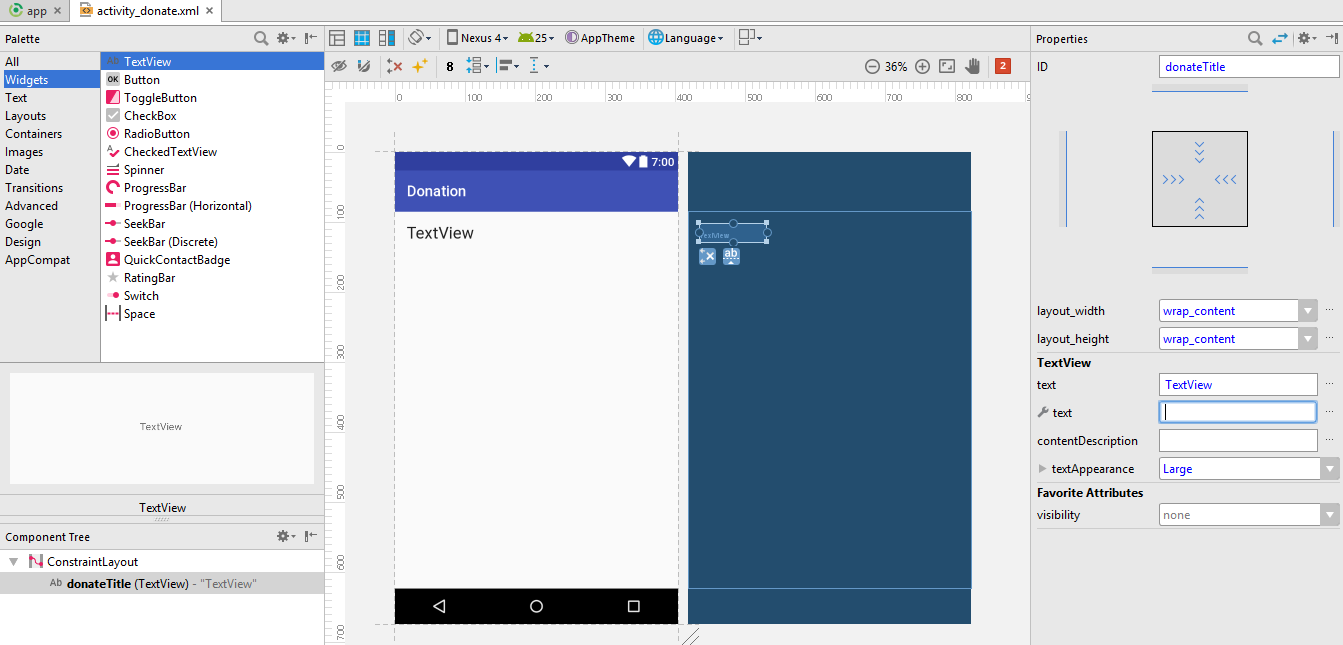
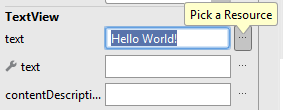
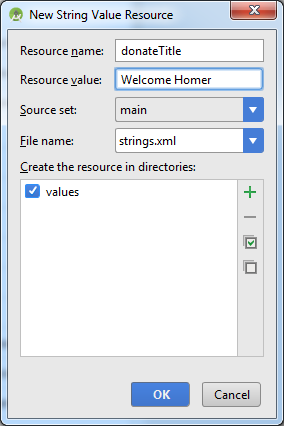
Drag the TextView and drop it into the top left hand corner of the Android design screen. In the properties pane, rename the ID to be donateTitle and change the textAppearance from Small to Large.
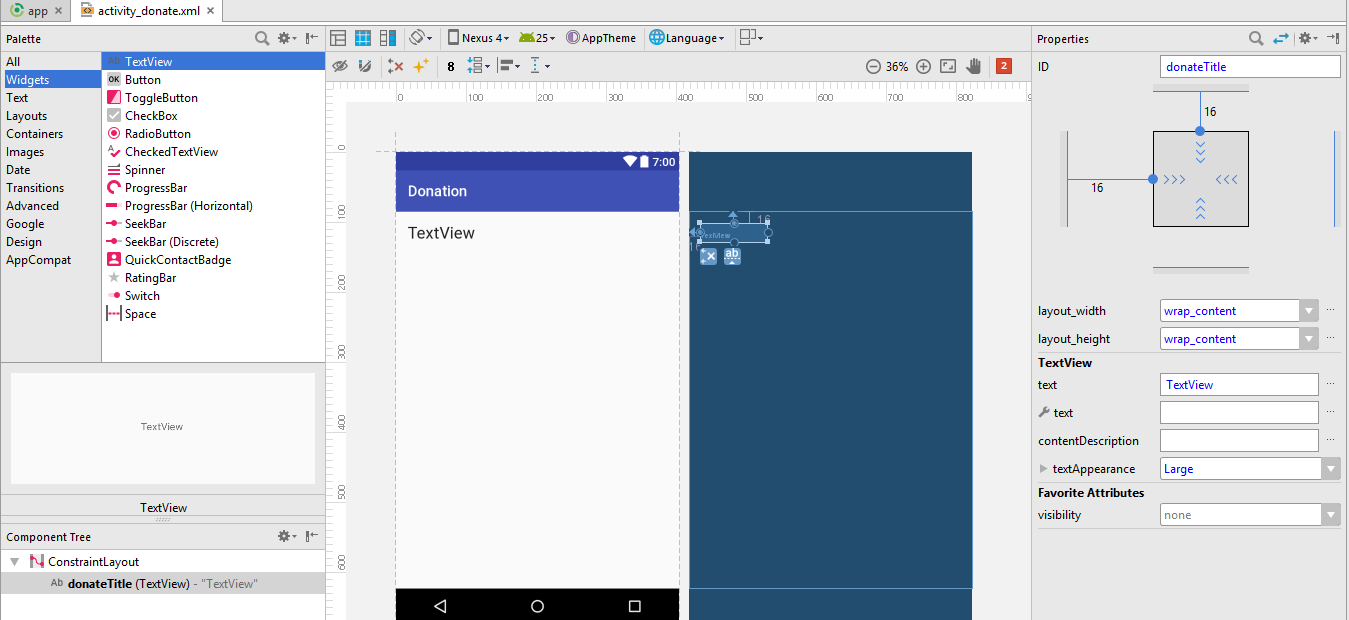
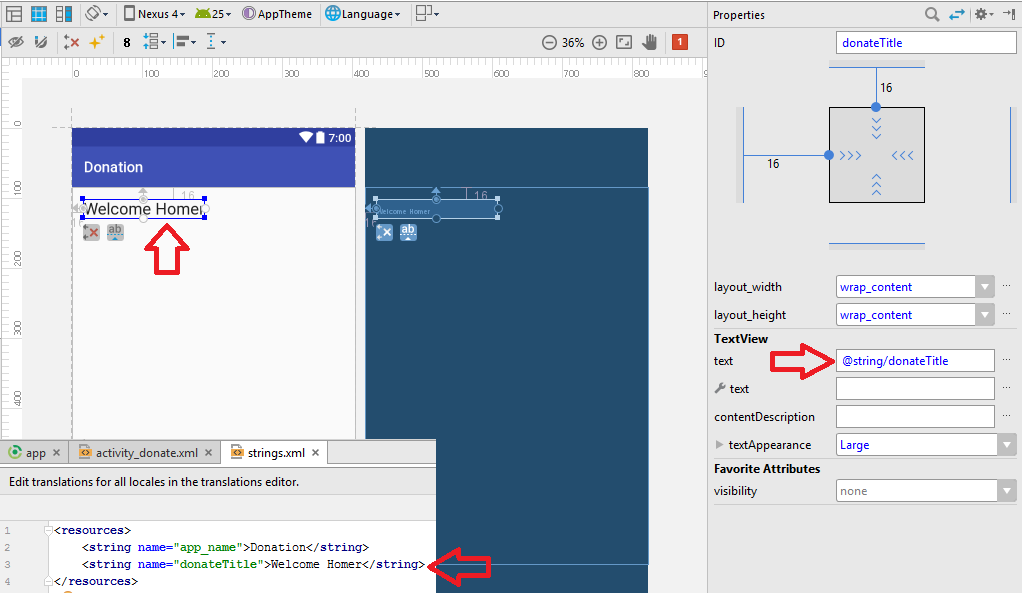
Now that we have created the donateTitle TextView, we need to inform the Constraint Layout where to place it. Currently it is only placed on our screen in design mode; when we run this, it will appear in location (0,0).
We want to set both the Left and the Top Margin to 16. To set the Left Margin, click on the green circle (the handle) to the left of the TextView and drag the arrow horizontally to the zero coordinate. You will notice that an 8 will appear as the left margin with in the Properties window. Click on this and change it to 16. Repeat this process to set the Top Margin to 16.

Toggle between Design and Text View
You may toggle between the design and textual representation of the screen using the tabs located towards the foot of the Android Studio perspective as shown in Figure 9.
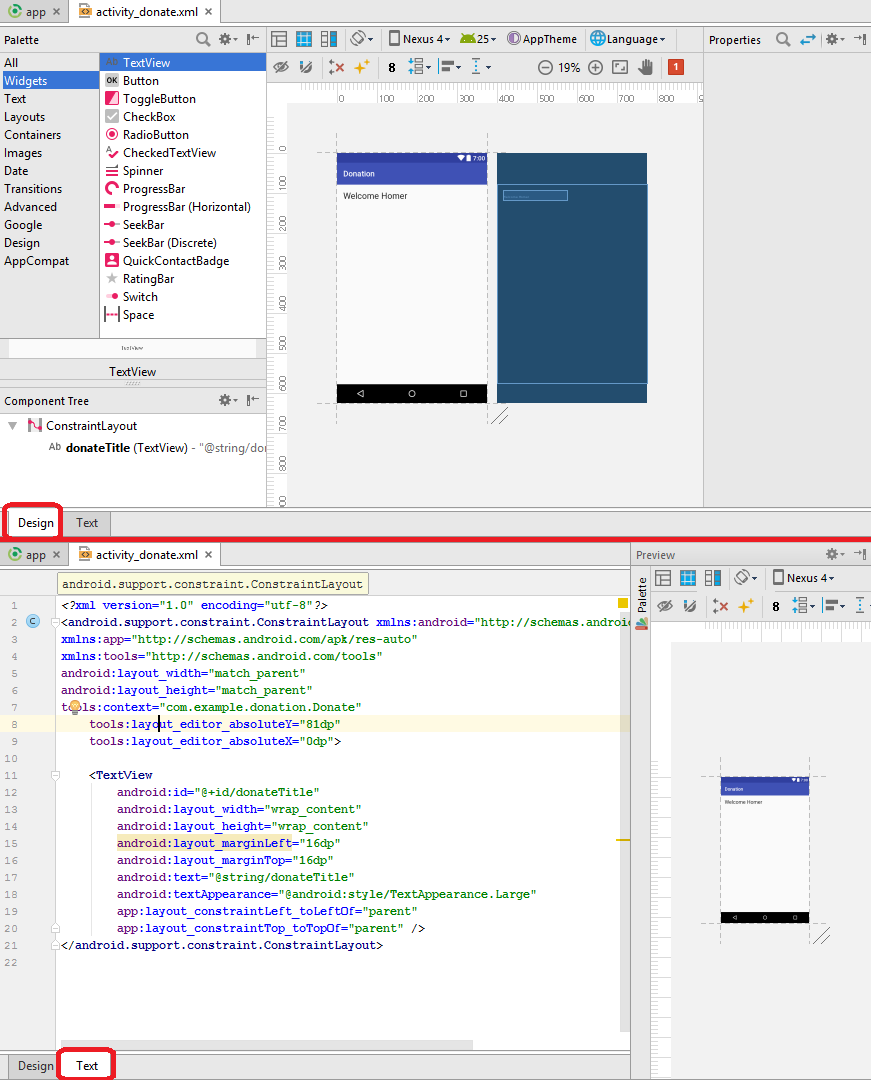
We will now closely inspect the following two files:
res/layout/activity_dontate.xml
<?xml version="1.0" encoding="utf-8"?>
<android.support.constraint.ConstraintLayout xmlns:android="http://schemas.android.com/apk/res/android"
xmlns:app="http://schemas.android.com/apk/res-auto"
xmlns:tools="http://schemas.android.com/tools"
android:layout_width="match_parent"
android:layout_height="match_parent"
tools:context="com.example.donation.Donate"
    tools:layout_editor_absoluteY="81dp"
    tools:layout_editor_absoluteX="0dp">

    <TextView
        android:id="@+id/donateTitle"
        android:layout_width="wrap_content"
        android:layout_height="wrap_content"
        android:layout_marginLeft="16dp"
        android:layout_marginTop="16dp"
        android:text="@string/donateTitle"
        android:textAppearance="@android:style/TextAppearance.Large"
        app:layout_constraintLeft_toLeftOf="parent"
        app:layout_constraintTop_toTopOf="parent" />
</android.support.constraint.ConstraintLayout>
res/values/strings.xml
<resources>
    <string name="app_name">Donation</string>
    <string name="donateTitle">Welcome Homer</string>
</resources>
Note the relationship between 'donateTitle' in both files, in relation to strings.
Using a TextView Widget, add the following string into the donate activity now - (medium sized text) - and follow the same procedure as above. The design view for your app should look like this:

and our two XML files will look like this:
res/layout/activity_donate.xml
<?xml version="1.0" encoding="utf-8"?>
<android.support.constraint.ConstraintLayout xmlns:android="http://schemas.android.com/apk/res/android"
xmlns:app="http://schemas.android.com/apk/res-auto"
xmlns:tools="http://schemas.android.com/tools"
android:layout_width="match_parent"
android:layout_height="match_parent"
tools:context="com.example.donation.Donate"
    tools:layout_editor_absoluteY="81dp"
    tools:layout_editor_absoluteX="0dp">

    <TextView
        android:id="@+id/donateTitle"
        android:layout_width="wrap_content"
        android:layout_height="wrap_content"
        android:layout_marginLeft="16dp"
        android:layout_marginTop="16dp"
        android:text="@string/donateTitle"
        android:textAppearance="@android:style/TextAppearance.Large"
        app:layout_constraintLeft_toLeftOf="parent"
        app:layout_constraintTop_toTopOf="parent" />

    <TextView
        android:id="@+id/donateSubtitle"
        android:layout_width="wrap_content"
        android:layout_height="wrap_content"
        android:text="@string/donateSubtitle"
        android:textAppearance="@android:style/TextAppearance.Medium"
        android:layout_marginTop="24dp"
        app:layout_constraintTop_toBottomOf="@+id/donateTitle"
        android:layout_marginLeft="16dp"
        app:layout_constraintLeft_toLeftOf="parent" />
</android.support.constraint.ConstraintLayout>
res/values/strings.xml
<resources>
    <string name="app_name">Donation</string>
    <string name="donateTitle">Welcome Homer</string>
    <string name="donateSubtitle">Please give generously</string>
</resources>
Donate Button
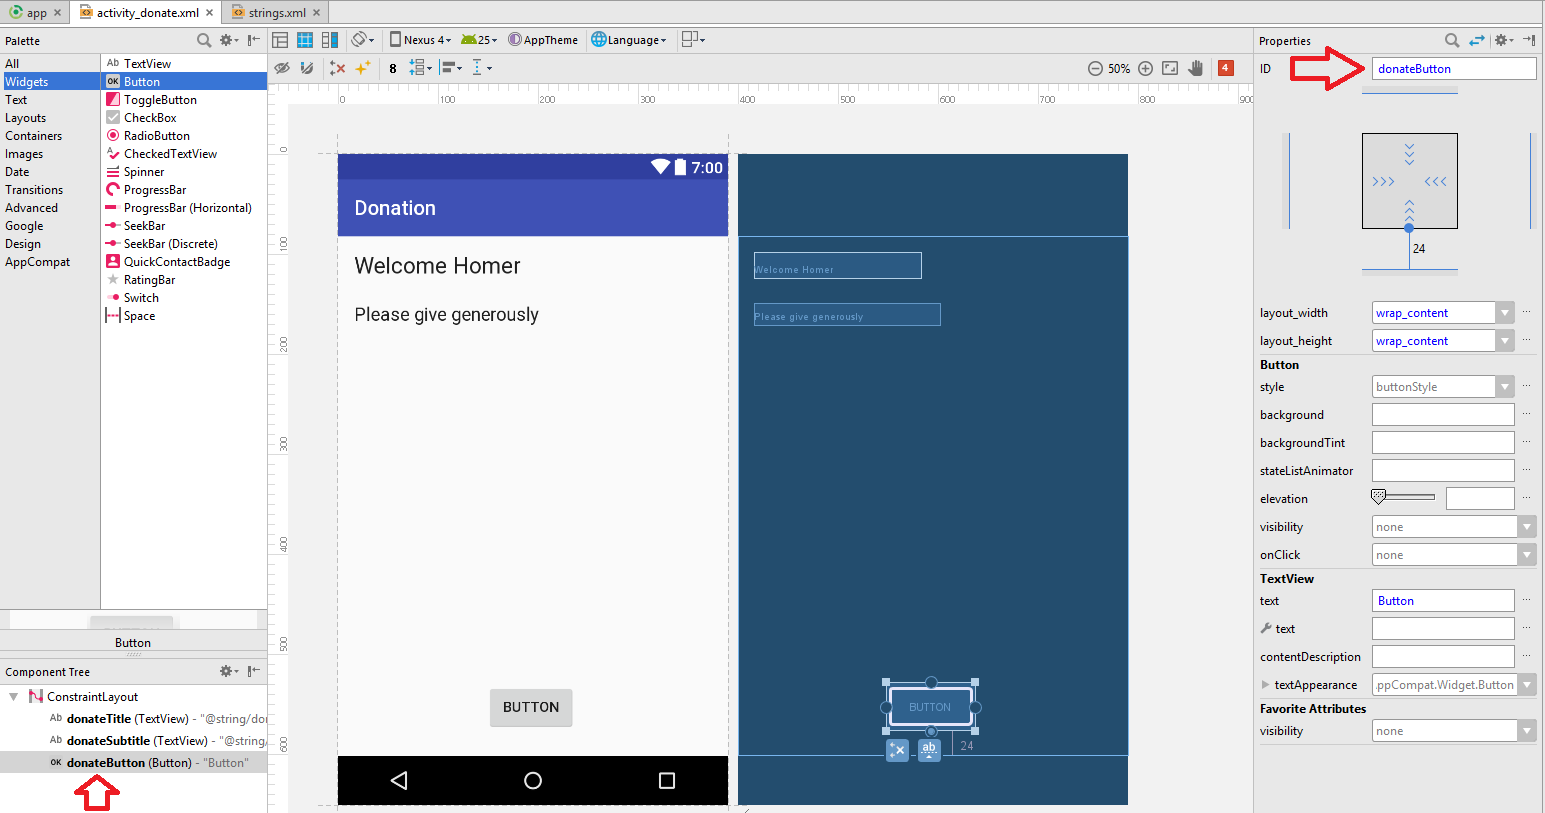
Place a button widget directly on to activity_donate layout - attached to the bottom of the screen as shown:

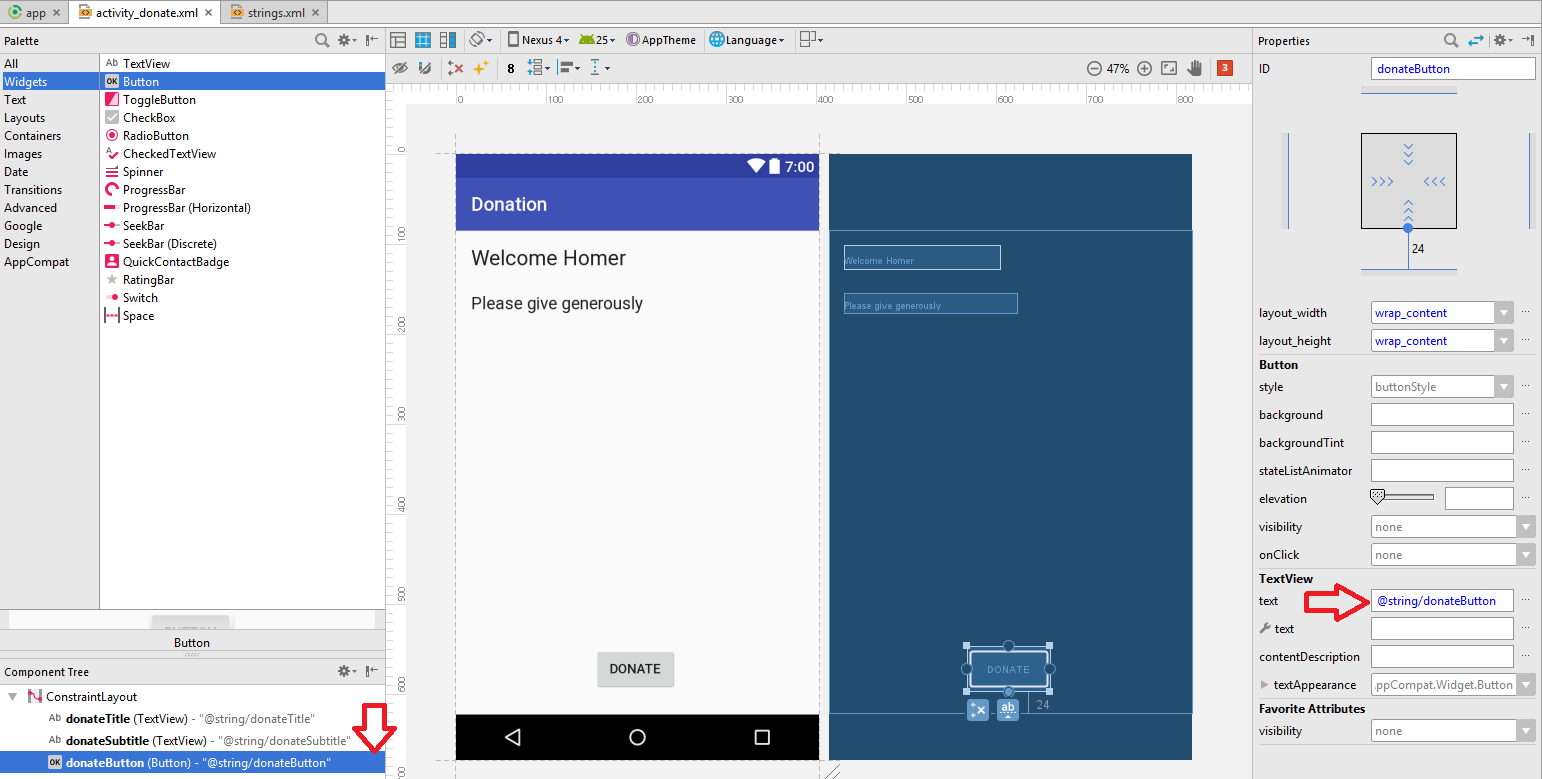
Following a similar procedure as in the previous step, rename the button and add an id, as shown in Figures 2 and 3.
Fixing the Constraints
Click on the text view for activity_donate.xml. You should notice that the Button element is underlined, indicating that something is wrong. Hover over it and it will show you this message:
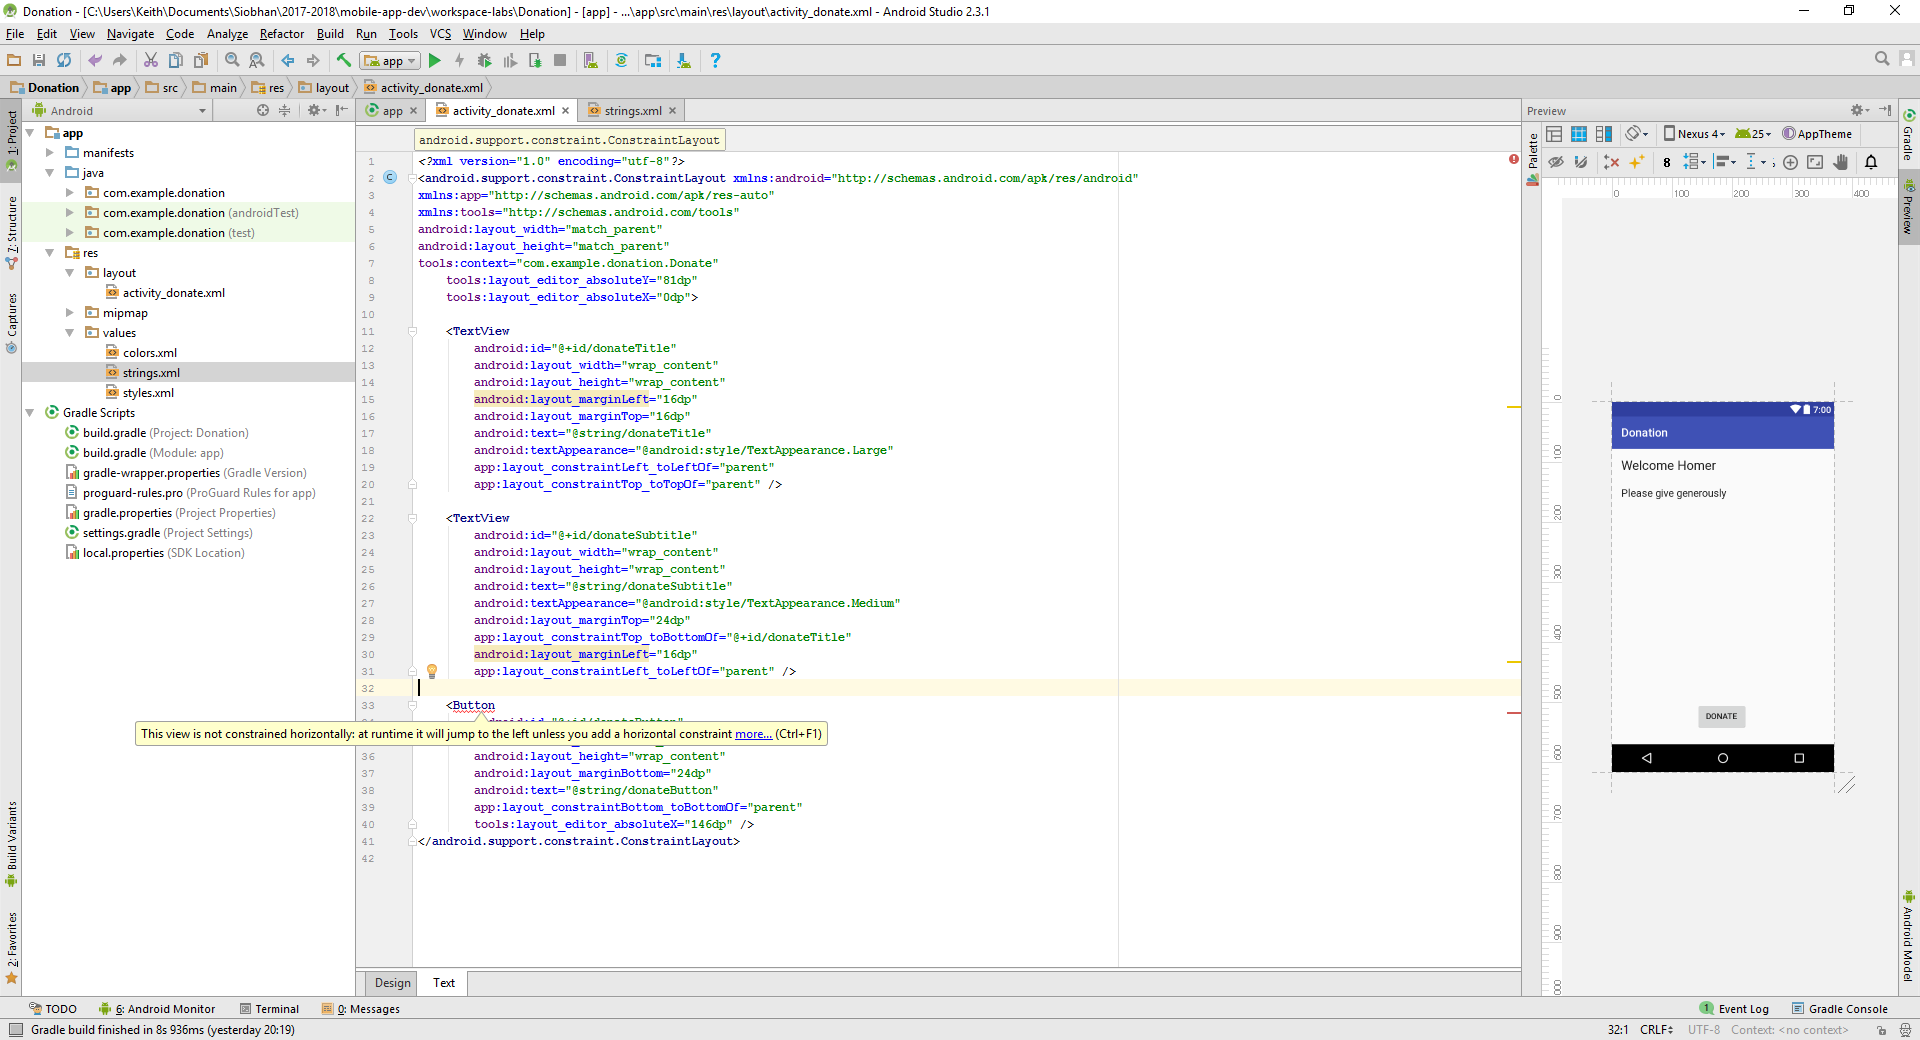
The message is telling you that you haven't constrained your Donate button on the horizontal axis and it will jump to the left at runtime. Return to your Design view and rectify this. As you want to centre this button, you will need to add both a left and a right margin.
activity_donate.xml
<?xml version="1.0" encoding="utf-8"?>
<android.support.constraint.ConstraintLayout xmlns:android="http://schemas.android.com/apk/res/android"
xmlns:app="http://schemas.android.com/apk/res-auto"
xmlns:tools="http://schemas.android.com/tools"
android:layout_width="match_parent"
android:layout_height="match_parent"
tools:context="com.example.donation.Donate"
    tools:layout_editor_absoluteY="81dp"
    tools:layout_editor_absoluteX="0dp">

    <TextView
        android:id="@+id/donateTitle"
        android:layout_width="wrap_content"
        android:layout_height="wrap_content"
        android:layout_marginLeft="16dp"
        android:layout_marginTop="16dp"
        android:text="@string/donateTitle"
        android:textAppearance="@android:style/TextAppearance.Large"
        app:layout_constraintLeft_toLeftOf="parent"
        app:layout_constraintTop_toTopOf="parent" />

    <TextView
        android:id="@+id/donateSubtitle"
        android:layout_width="wrap_content"
        android:layout_height="wrap_content"
        android:text="@string/donateSubtitle"
        android:textAppearance="@android:style/TextAppearance.Medium"
        android:layout_marginTop="24dp"
        app:layout_constraintTop_toBottomOf="@+id/donateTitle"
        android:layout_marginLeft="16dp"
        app:layout_constraintLeft_toLeftOf="parent" />

    <Button
        android:id="@+id/donateButton"
        android:layout_width="wrap_content"
        android:layout_height="wrap_content"
        android:layout_marginBottom="24dp"
        android:text="@string/donateButton"
        app:layout_constraintBottom_toBottomOf="parent"
        android:layout_marginLeft="8dp"
        app:layout_constraintLeft_toLeftOf="parent"
        android:layout_marginRight="8dp"
        app:layout_constraintRight_toRightOf="parent" />
</android.support.constraint.ConstraintLayout>
strings.xml
<resources>
    <string name="app_name">Donation</string>
    <string name="donateTitle">Welcome Homer</string>
    <string name="donateSubtitle">Please give generously</string>
    <string name="donateButton">Donate</string>
</resources>
If there is a deviation from the above - retrace your steps (delete the button) until you can match the above.
Donate.java
We can now switch our attention to the Java Activity class, Donate.java. This is the generated code:
package com.example.donation;

import android.support.v7.app.AppCompatActivity;
import android.os.Bundle;

public class Donate extends AppCompatActivity {

    @Override
    protected void onCreate(Bundle savedInstanceState) {
        super.onCreate(savedInstanceState);
        setContentView(R.layout.activity_donate);
    }
}
For any 'controls' a user can interact with we usually find it useful to associate a class member with that object. Currently we have only one - a Button. The text fields we dont consider 'interactive' as such, so we will not include those.
Insert the following new field into the class:
private Button donateButton;The class, Button, will have to be imported (you can use ALT+Enter to do this for you).
Note that the class name (i.e. the type) will always match the name in the Palette:
We are free to call the variable anything we like. However, in order to keep confusion to a minimum, always call the variable by the same name you used in the Component Tree view:

In onCreate - we need to initialise this variable:
donateButton = (Button) findViewById(R.id.donateButton);We might also add a logging message so we can have some feedback as the app launches:
Log.v("Donate", "got the donate button");We should check the donate button actually exists before logging our success:
    if (donateButton != null)
    {
      Log.v("Donate", "Really got the donate button");
    }
This is the complete activity class:
package com.example.donation;

import android.support.v7.app.AppCompatActivity;
import android.os.Bundle;
import android.util.Log;
import android.widget.Button;

public class Donate extends AppCompatActivity {

    private Button donateButton;

    @Override
    protected void onCreate(Bundle savedInstanceState) {
        super.onCreate(savedInstanceState);
        setContentView(R.layout.activity_donate);

        donateButton = (Button) findViewById(R.id.donateButton);

        if (donateButton != null)
        {
            Log.v("Donate", "Really got the donate button");
        }
    }
}
Finding the log message can be very difficult, unless you set a filter.
- LogCat documentation describes how to manage logging.
Click on Android Monitor in the toolbar at the bottom of the Android Studio screen. In the'LogCat' view, create a filter by selecting "Edit Filter Configuration":
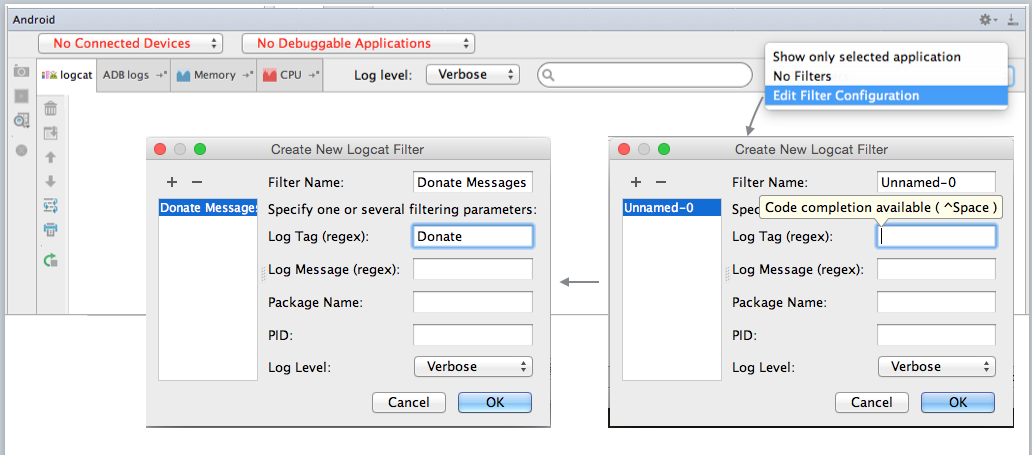
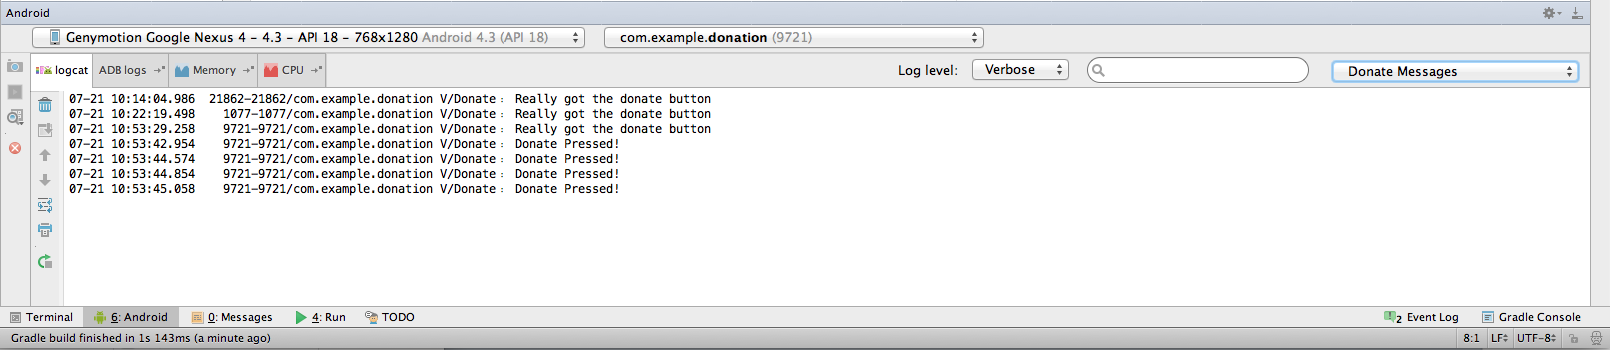
When we start running our app (which we will do later in this lab) and you select the filter, you should see your message:
Documentation
The android documentation is particularly helpful and well designed. These are the two key starting points:
- http://developer.android.com/guide/components/index.html
- http://developer.android.com/reference/packages.html
The first is designed to be read though as a guide, perhaps independent of any work in Android Studio. You should get into the habit of devoting an hour or two a week just reading this section.
The Reference guide should always be open as you are working on labs or projects, and you should make a serious effort to get to grips with at least some of the information here.
Taking the Button class we have just started using. We can immediately find the reference just by knowing the import statement in our Activity class:
import android.widget.Button;.. translates to
(note the last three segments match the package name). Open this page now. Read just as far as the "Button Style" heading. There seems to be two ways of learning when an button event occurs. The first method is using the event handler/listener - but a second easier method is also available.
Try this now. Bring in a new method into Donate class:
  public void donateButtonPressed (View view)
  {
    Log.v("Donate", "Donate Pressed!");
   }
Import the View class:
import android.view.View;Then, edit the activity_donate xml file - and add a new attribute into the Button xml fragment:
    <Button
        android:id="@+id/donateButton"
        android:layout_width="wrap_content"
        android:layout_height="wrap_content"
        android:layout_marginBottom="24dp"
        android:text="@string/donateButton"
        app:layout_constraintBottom_toBottomOf="parent"
        android:layout_marginLeft="8dp"
        app:layout_constraintLeft_toLeftOf="parent"
        android:layout_marginRight="8dp"
        app:layout_constraintRight_toRightOf="parent"
        android:onClick="donateButtonPressed"/>
(the very last entry)
Save everything.
Executing the app
Run your app.
If this is your first time executing an Android app, a window will pop up letting you know that you have no USB devices or running emulators.
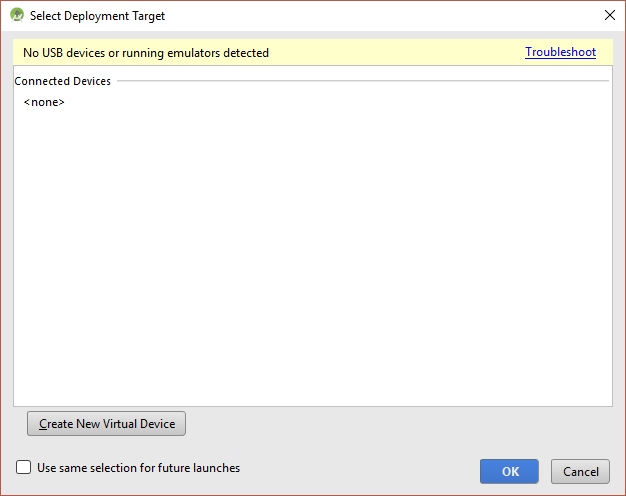
Create a new virtual device for the Phone category (choose the default options given to you).
If HAXM (for better emulation performance) is not installed on your computer, install it:
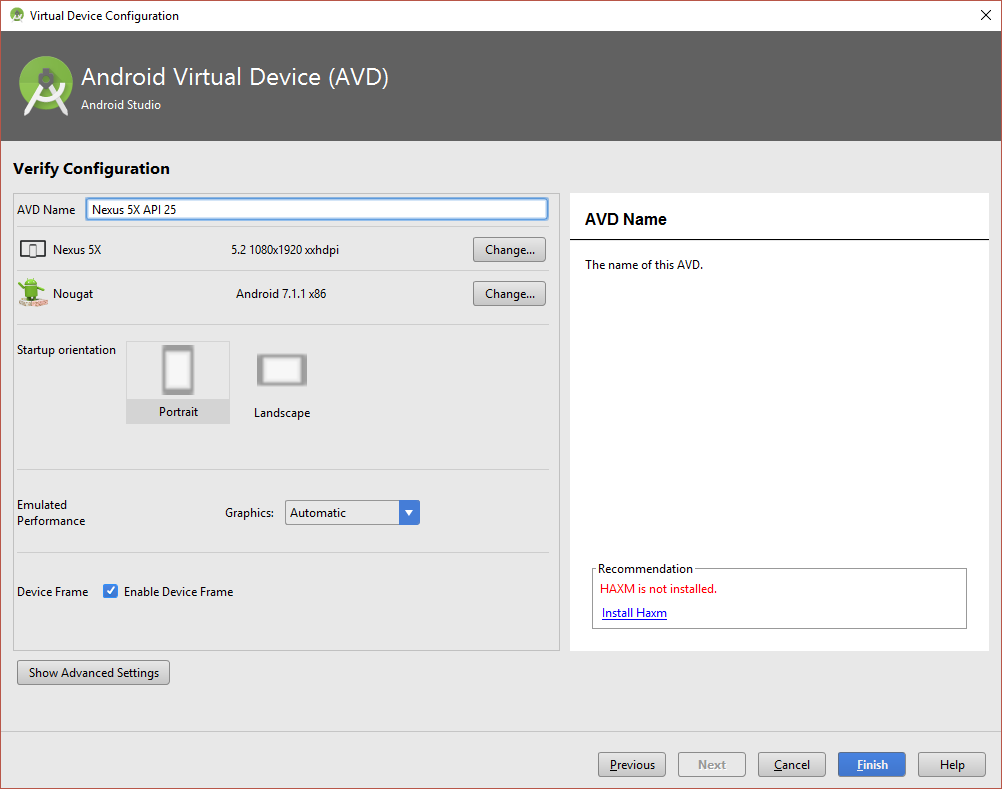
Select your Available Virtual Device and click the OK button to run your app.
Monitor the log as you press the button:
We now have our first interaction working!
Research + New Control Layout
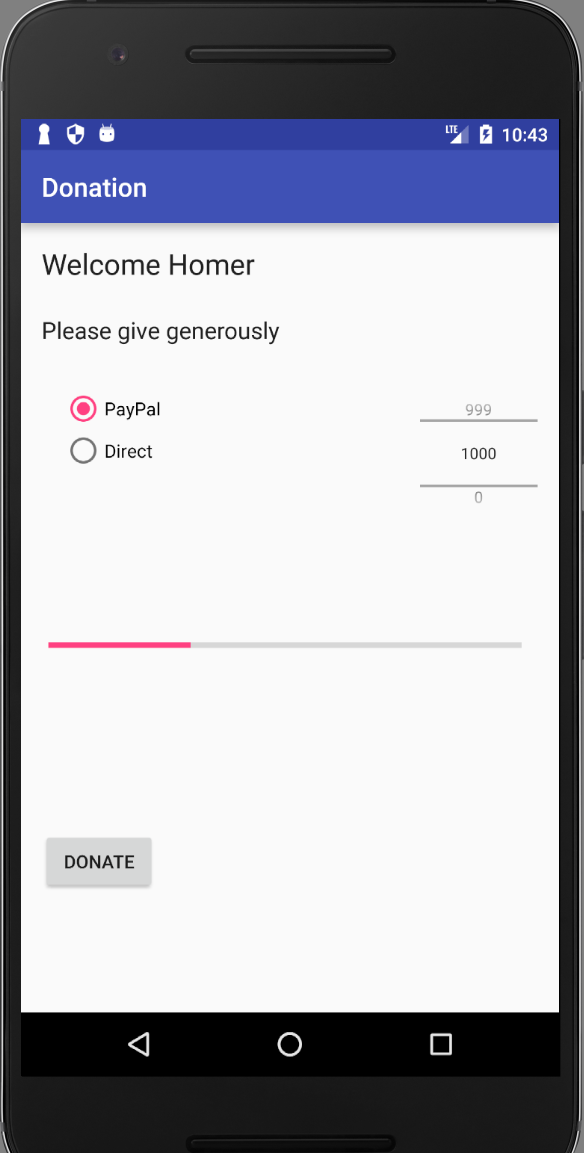
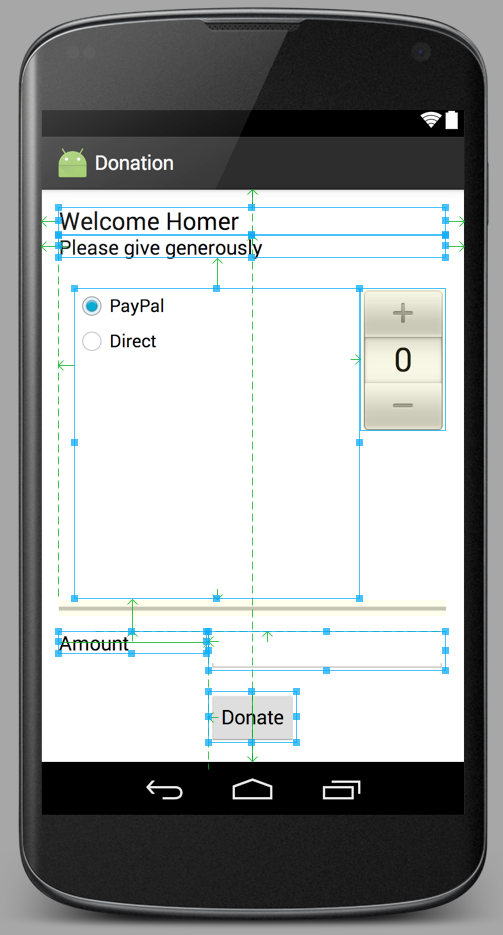
Recall the UI we are trying to implement:
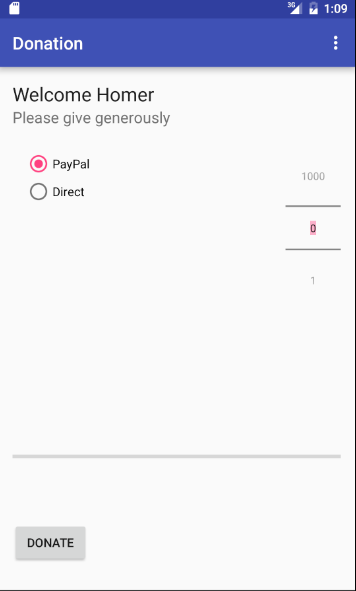
We need a Radio Buttons, some sort of selection/combo box + a progress bar. These can be found in various locations in the palette:
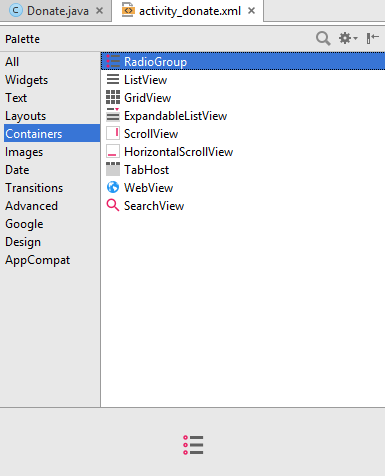
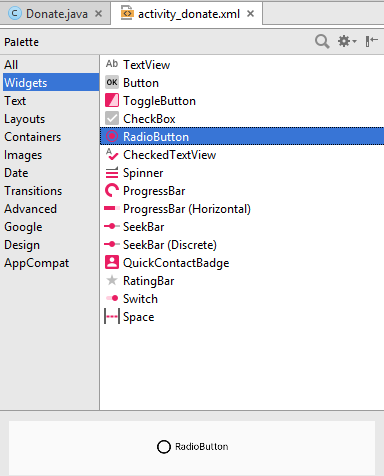
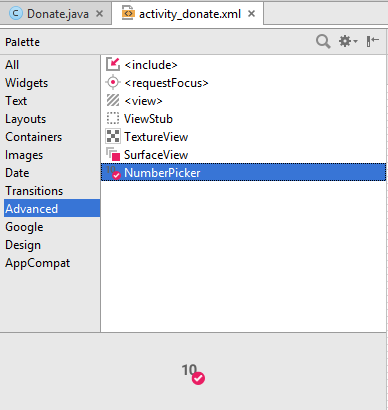
RadioGroup, ProgressBar and NumberPicker seem likely candidates. The names of these controls are exactly as advertised, and we can find them as illustrated in the preceeding Figures 2, 3 & 4. To verify this, try importing them at the top of the Donate activity class:
import android.widget.RadioGroup;
import android.widget.NumberPicker;
import android.widget.ProgressBar;
... and we can bring in three fields into the class:
  private RadioGroup   paymentMethod;
  private ProgressBar  progressBar;
  private NumberPicker amountPicker;
We can also open up three pages of documentation - which we can reverse engineer from the package/class names:
- http://developer.android.com/reference/android/widget/RadioGroup.html
- http://developer.android.com/reference/android/widget/ProgressBar.html
- http://developer.android.com/reference/android/widget/NumberPicker.html
Note this time we have gone to the Activity class before actually creating the controls. We should do this now - and remember to use the same names (for the IDs) as we create the controls.

Getting the layout +id names as shown above may take some practice. However, it is an essential skill to get on top of, even it it takes a lot of trial and error. Note also that we moved the Donate button to the left of the screen, rather than in the centre.
For reference purposes (try to do it your self), these are the relevant generated xml files:
<?xml version="1.0" encoding="utf-8"?>
<android.support.constraint.ConstraintLayout xmlns:android="http://schemas.android.com/apk/res/android"
xmlns:app="http://schemas.android.com/apk/res-auto"
xmlns:tools="http://schemas.android.com/tools"
android:layout_width="match_parent"
android:layout_height="match_parent"
tools:context="com.example.donation.Donate"
    tools:layout_editor_absoluteY="81dp"
    tools:layout_editor_absoluteX="0dp">

    <TextView
        android:id="@+id/donateTitle"
        android:layout_width="wrap_content"
        android:layout_height="wrap_content"
        android:layout_marginStart="16dp"
        android:layout_marginTop="16dp"
        android:text="@string/donateTitle"
        android:textAppearance="@android:style/TextAppearance.Large"
        app:layout_constraintLeft_toLeftOf="parent"
        app:layout_constraintTop_toTopOf="parent" />

    <TextView
        android:id="@+id/donateSubtitle"
        android:layout_width="wrap_content"
        android:layout_height="wrap_content"
        android:text="@string/donateSubtitle"
        android:textAppearance="@android:style/TextAppearance.Medium"
        android:layout_marginTop="24dp"
        app:layout_constraintTop_toBottomOf="@+id/donateTitle"
        android:layout_marginStart="16dp"
        app:layout_constraintLeft_toLeftOf="parent" />

    <Button
        android:id="@+id/donateButton"
        android:layout_width="wrap_content"
        android:layout_height="wrap_content"
        android:layout_marginBottom="24dp"
        android:text="@string/donateButton"
        app:layout_constraintBottom_toBottomOf="parent"
        android:layout_marginStart="16dp"
        app:layout_constraintLeft_toLeftOf="parent"
        android:onClick="donateButtonPressed"
        android:layout_marginTop="64dp"
        app:layout_constraintTop_toBottomOf="@+id/progressBar"/>

    <RadioGroup
        android:id="@+id/paymentMethod"
        android:layout_width="wrap_content"
        android:layout_height="wrap_content"
        android:layout_marginStart="32dp"
        android:layout_marginTop="32dp"
        app:layout_constraintLeft_toLeftOf="parent"
        app:layout_constraintTop_toBottomOf="@+id/donateSubtitle">

        <RadioButton
            android:id="@+id/payPal"
            android:layout_width="wrap_content"
            android:layout_height="wrap_content"
            android:checked="true"
            android:text="@string/PayPal" />

        <RadioButton
            android:id="@+id/Direct"
            android:layout_width="wrap_content"
            android:layout_height="wrap_content"
            android:text="@string/Direct" />
    </RadioGroup>

    <ProgressBar
        android:id="@+id/progressBar"
        style="?android:attr/progressBarStyleHorizontal"
        android:layout_width="362dp"
        android:layout_height="18dp"
        android:layout_marginLeft="16dp"
        app:layout_constraintLeft_toLeftOf="parent"
        android:layout_marginRight="16dp"
        app:layout_constraintRight_toRightOf="parent"
        app:layout_constraintHorizontal_bias="0.3"
        android:layout_marginTop="124dp"
        app:layout_constraintTop_toBottomOf="@+id/paymentMethod" />

    <NumberPicker
        android:id="@+id/amountPicker"
        android:layout_width="90dp"
        android:layout_height="100dp"
        android:layout_marginTop="32dp"
        app:layout_constraintTop_toBottomOf="@+id/donateSubtitle"
        android:layout_marginEnd="16dp"
        app:layout_constraintRight_toRightOf="parent" />

</android.support.constraint.ConstraintLayout>
<resources>
<string name="app_name">Donation</string>
<string name="donateTitle">Welcome Homer</string>
<string name="donateSubtitle">Please give generously</string>
<string name="donateButton">Donate</string>
<string name="PayPal">PayPal</string>
<string name="Direct">Direct</string>
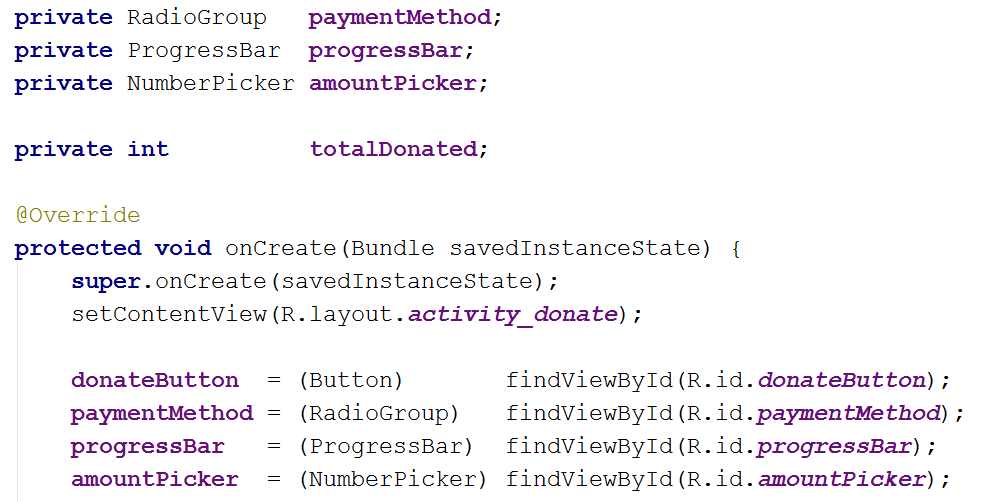
</resources>If we have our naming conventions right - then we can bind to these new controls in onCreate:
        paymentMethod = (RadioGroup)   findViewById(R.id.paymentMethod);
        progressBar   = (ProgressBar)  findViewById(R.id.progressBar);
        amountPicker  = (NumberPicker) findViewById(R.id.amountPicker);
This is the complete Donate class:
package com.example.donation;

import android.support.v7.app.AppCompatActivity;
import android.os.Bundle;
import android.util.Log;
import android.view.View;
import android.widget.Button;
import android.widget.NumberPicker;
import android.widget.ProgressBar;
import android.widget.RadioGroup;

public class Donate extends AppCompatActivity {

    private Button donateButton;
    private RadioGroup paymentMethod;
    private ProgressBar progressBar;
    private NumberPicker amountPicker;

    @Override
    protected void onCreate(Bundle savedInstanceState) {
        super.onCreate(savedInstanceState);
        setContentView(R.layout.activity_donate);

        donateButton  = (Button)       findViewById(R.id.donateButton);
        paymentMethod = (RadioGroup)   findViewById(R.id.paymentMethod);
        progressBar   = (ProgressBar)  findViewById(R.id.progressBar);
        amountPicker  = (NumberPicker) findViewById(R.id.amountPicker);

        amountPicker.setMinValue(0);
        amountPicker.setMaxValue(1000);
    }

    public void donateButtonPressed (View view)
    {
        Log.v("Donate", "Donate Pressed!");
    }
}
NumberPicker
This is our reference documentation:
which is a little overwhelming. Back in the guides:
we might find some useful tutorial type introduction to this control - under 'User Interface' - 'Input Controls'
.. and this is the page on 'pickers'
This documentation is concerned with Fragments - a concept that may be difficult to grasp initially, and also explores the usage of date and time pickers.
We can get up and running without this much fuss. Returning to the documentation, these three methods should be sufficient initially:
- http://developer.android.com/reference/android/widget/NumberPicker.html#setMaxValue(int)
- http://developer.android.com/reference/android/widget/NumberPicker.html#setMinValue(int)
- http://developer.android.com/reference/android/widget/NumberPicker.html#getValue()
Observe that in the method onCreate, in the previous step, we have initialized the number picker minium and maxium permitted values:
    amountPicker.setMinValue(0);
    amountPicker.setMaxValue(1000);
Modify donateButtonPressed as shown here and verify that when Donate button is is pressed the method is invoked, outputting the message + value as shown in the Logcat window:
  public void donateButtonPressed (View view)
  {
    int amount = amountPicker.getValue();
    Log.v("Donate", "Donate Pressed! with amount " + amount);
   }
Run this now - and verify that it operates as expected (see the actual amounts in the log file).
Radio Button
In donateButtonPressed we need to discover which payment method has been selected. Our RadioGroup documentation is here:
This looks like the method we need:
This is a revised version of donateButtonPressed()
  public void donateButtonPressed (View view)
  {
    int amount = amountPicker.getValue();
    int radioId = paymentMethod.getCheckedRadioButtonId();
    String method = "";
    if (radioId == R.id.payPal)
    {
      method = "PayPal";
    }
    else
    {
      method = "Direct";
    }
    Log.v("Donate", "Donate Pressed! with amount " + amount + ", method: " + method);
   }
Run it now and verify we are getting the correct logs.

We can simplify it somewhat by reducing the if statement to a single line:
String method = radioId == R.id.payPal ? "PayPal" : "Direct";This is the Java ternary operator:
This is the complete activity class:
package com.example.donation;

import android.support.v7.app.AppCompatActivity;
import android.os.Bundle;
import android.util.Log;
import android.view.View;
import android.widget.Button;
import android.widget.NumberPicker;
import android.widget.ProgressBar;
import android.widget.RadioGroup;

public class Donate extends AppCompatActivity {

    private Button donateButton;
    private RadioGroup paymentMethod;
    private ProgressBar progressBar;
    private NumberPicker amountPicker;

    @Override
    protected void onCreate(Bundle savedInstanceState) {
        super.onCreate(savedInstanceState);
        setContentView(R.layout.activity_donate);

        donateButton  = (Button)       findViewById(R.id.donateButton);
        paymentMethod = (RadioGroup)   findViewById(R.id.paymentMethod);
        progressBar   = (ProgressBar)  findViewById(R.id.progressBar);
        amountPicker  = (NumberPicker) findViewById(R.id.amountPicker);

        amountPicker.setMinValue(0);
        amountPicker.setMaxValue(1000);
    }

    public void donateButtonPressed (View view)
    {
        int amount = amountPicker.getValue();
        int radioId = paymentMethod.getCheckedRadioButtonId();
        String method = radioId == R.id.payPal ? "PayPal" : "Direct";
        Log.v("Donate", "Donate Pressed! with amount " + amount + ", method: " + method);
    }
}
Progress
The progress bar documentation:
offers us advice on using the progress bar in multi-threaded application. Not quite what we are ready for yet! (but file it away for future reference).
These two methods are probably what we need:
- http://developer.android.com/reference/android/widget/ProgressBar.html#setMax(int)
- http://developer.android.com/reference/android/widget/ProgressBar.html#setProgress(int)
First we would need to equip our activity with the ability to remember the total of all funds donated. Include this as an instance field:
private int totalDonated;Lets set max progress bar to 10000 in onCreate:
progressBar.setMax(10000);.. and set the progress in donateButtonPressed:
    totalDonated = totalDonated + amount;
    progressBar.setProgress(totalDonated);
    Log.v("Donate", "Current total " + totalDonated);
Try this now and observe the progress bar.
This is the complete class:
package com.example.donation;

import android.support.v7.app.AppCompatActivity;
import android.os.Bundle;
import android.util.Log;
import android.view.View;
import android.widget.Button;
import android.widget.NumberPicker;
import android.widget.ProgressBar;
import android.widget.RadioGroup;

public class Donate extends AppCompatActivity {

    private Button donateButton;
    private RadioGroup paymentMethod;
    private ProgressBar progressBar;
    private NumberPicker amountPicker;
    private int totalDonated;

    @Override
    protected void onCreate(Bundle savedInstanceState) {
        super.onCreate(savedInstanceState);
        setContentView(R.layout.activity_donate);

        donateButton  = (Button)       findViewById(R.id.donateButton);
        paymentMethod = (RadioGroup)   findViewById(R.id.paymentMethod);
        progressBar   = (ProgressBar)  findViewById(R.id.progressBar);
        amountPicker  = (NumberPicker) findViewById(R.id.amountPicker);

        amountPicker.setMinValue(0);
        amountPicker.setMaxValue(1000);

        progressBar.setMax(10000);
    }

    public void donateButtonPressed (View view)
    {
        int amount = amountPicker.getValue();
        int radioId = paymentMethod.getCheckedRadioButtonId();
        String method = radioId == R.id.payPal ? "PayPal" : "Direct";
        totalDonated = totalDonated + amount;
        progressBar.setProgress(totalDonated);

        Log.v("Donate", "Donate Pressed! with amount " + amount + ", method: " + method);
        Log.v("Donate", "Current total " + totalDonated);

    }
}
Here is another version of exactly the same class:
package com.example.donation;

import android.support.v7.app.AppCompatActivity;
import android.os.Bundle;
import android.util.Log;
import android.view.View;
import android.widget.Button;
import android.widget.NumberPicker;
import android.widget.ProgressBar;
import android.widget.RadioGroup;

public class Donate extends AppCompatActivity {

    private Button donateButton;
    private RadioGroup paymentMethod;
    private ProgressBar progressBar;
    private NumberPicker amountPicker;
    private int totalDonated;

    @Override
    protected void onCreate(Bundle savedInstanceState) {
        super.onCreate(savedInstanceState);
        setContentView(R.layout.activity_donate);

        donateButton  = (Button)       findViewById(R.id.donateButton);
        paymentMethod = (RadioGroup)   findViewById(R.id.paymentMethod);
        progressBar   = (ProgressBar)  findViewById(R.id.progressBar);
        amountPicker  = (NumberPicker) findViewById(R.id.amountPicker);

        amountPicker.setMinValue(0);
        amountPicker.setMaxValue(1000);

        progressBar.setMax(10000);
    }

    public void donateButtonPressed (View view)
    {
        totalDonated  = totalDonated + amountPicker.getValue();
        String method = paymentMethod.getCheckedRadioButtonId() == R.id.payPal ? "PayPal" : "Direct";
        progressBar.setProgress(totalDonated);

        Log.v("Donate", amountPicker.getValue() + " donated by " +  method + "\nCurrent total " + totalDonated);
    }
}
Examine them carefully. What are the differences? Why make these changes?
Note also the careful attention to spacing and alignment in the following code. Not just correct indentation, but continual attention to structuring each method carefully, removing duplication and unnecessary code and formatting/aligning the declarations and assignment statements in a table like structure:
Android code can become very verbose and complex. Carefully formatting is essential if you are not to be overwhelmed.
Exercises
Exercise 1:
You will find archives of the Donation labs in this repo:
You may use this as a reference if you have any unresolved anomalies in your code.
To download the code (as a zip) upto and including step 8 of this lab, click on the release menu item in this repo and you will be brought to the Releases section. Here you will see the downloads associated with V1.0 of Donation.
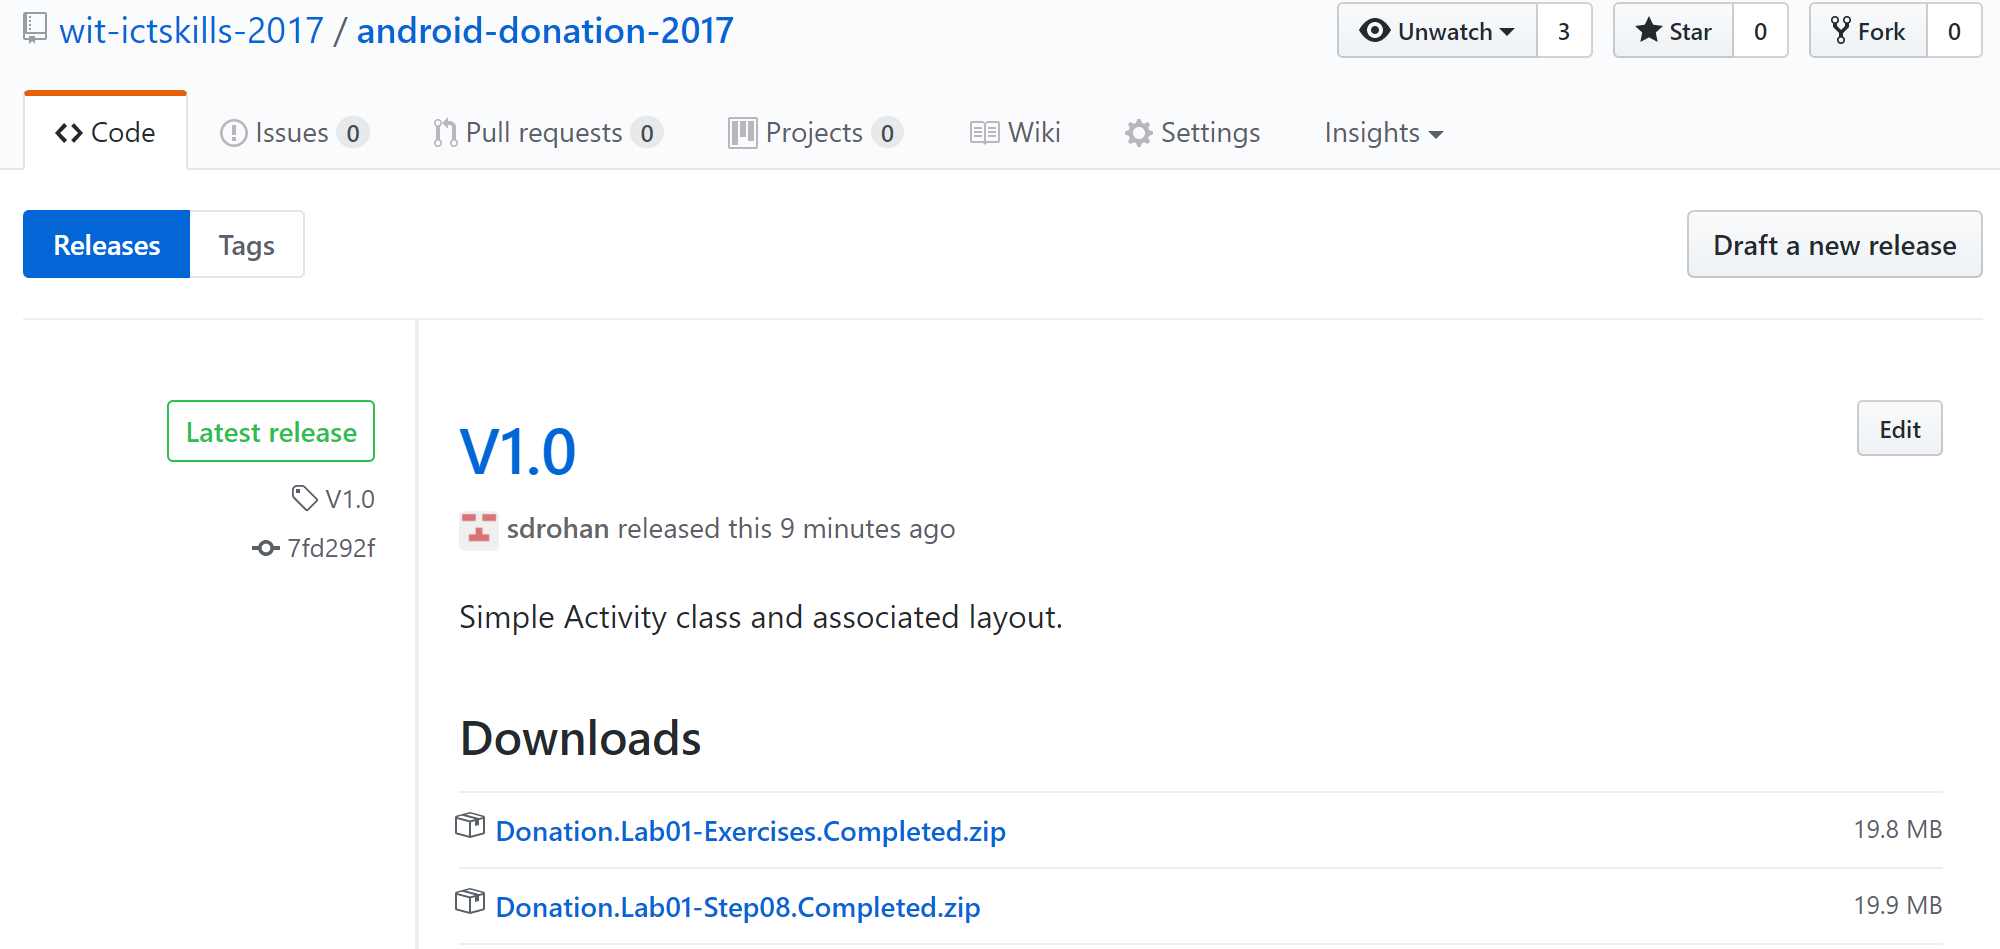
Click on the appropriate Donation.*.zip file you require to download the archive you want.
You should now put your Donation application under git version control. You are already familiar with this procedure:
- cd into the project on your computer in a terminal
- create a suitable .gitignore file (sample below)
- run
git add . - commit with a suitable message
- create a repository on your Bitbucket account named `donation-android-2017'
- follow the Bitbucket documented procedure to establish tracking between local and remote repos
- run the push command to initialize the remote repo with the latest local snapshot.
Use this repository pair to maintain a record of the Android Donation app as you develop it further during the course.
Sample .gitignore file:
#built application files
*.apk
*.ap_

# files for the dex VM
*.dex

# Java class files
*.class

# generated files
bin/
gen/

# Local configuration file (sdk path, etc)
local.properties

# Windows thumbnail db
Thumbs.db

# OSX files
.DS_Store

# Android Studio
# https://www.jetbrains.com/idea/help/project.html
*.iml
.idea/workspace.xml
.gradle
build/
You could also create your own android-donation repo in GitHub and maintain releases as we have done in this lab and will do in future labs i.e. start building a public CV of your work. Note that we highly recommend not using GitHub public releases for your assignment work (until grading has been completed).
Exercise 2:
Consider an alternative to the NumberPicker - specifically one of the "Text" controls:
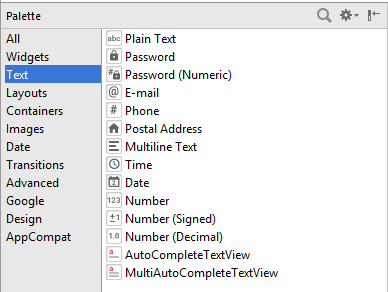
These are mostly EditView objects:
Redesign the activity to take a value from the picker or directly from a text view:
If the number picker is set to zero, then attempt to get a number from the text view.
Here is a hint (a version of donatButonPressed that does what we want):
   public void donateButtonPressed (View view)
    {
        String method = paymentMethod.getCheckedRadioButtonId() == R.id.payPal ? "PayPal" : "Direct";

        int donatedAmount = amountPicker.getValue();
        if (donatedAmount == 0)
        {
            String text = amountText.getText().toString();
            if (!text.equals("")) {
                donatedAmount = Integer.parseInt(text);
            }
        }

        totalDonated = totalDonated + donatedAmount;
        progressBar.setProgress(totalDonated);
        Log.v("Donate", donatedAmount + " donated by " +  method + "\nCurrent total " + totalDonated);
    }
Exercise 3:
Revise the app such that when the target is achieved (10000) - then no more donations accepted, and the user is made aware of this.
Hint - here is how you can display a simple alert:
      Toast toast = Toast.makeText(this, "Target Exceeded!", Toast.LENGTH_SHORT);
      toast.show();
Exercise 4:
Show on screen at all times the total amount donated.
You will use standard TextView for this:
You already have a number of these on screen. Your layout could be revised to look like this:
