Objectives
We continue the implementation of Donation to including the welcome, sign up and login. Support these views with a User model, and validate the users on log in. Continue to build on your Donation repository.
Exercise 1
Run the app and insert amounts of varying lengths (1, 222, 23, 2323). Note that the second column - payment method -may be displayed at different positions. If this happens, fix it.
Hint: each row is laid out by a row_donate.xml layout. The easiest way to fix this would be to experiment with they layout, and have the text fields aligned with the edges and not with each other.
Solution
This is a revised version of the row_layout.xml file:
<?xml version="1.0" encoding="utf-8"?>
<RelativeLayout xmlns:android="http://schemas.android.com/apk/res/android"
    android:layout_width="match_parent"
    android:layout_height="match_parent" >

    <TextView
        android:id="@+id/row_amount"
        android:layout_width="wrap_content"
        android:layout_height="wrap_content"
        android:layout_alignParentStart="true"
        android:layout_alignParentTop="true"
        android:layout_marginStart="48dp"
        android:layout_marginTop="20dp"
        android:text="@string/defaultAmount" />

    <TextView
        android:id="@+id/row_method"
        android:layout_width="wrap_content"
        android:layout_height="wrap_content"
        android:layout_alignBaseline="@+id/row_amount"
        android:layout_alignBottom="@+id/row_amount"
        android:layout_alignParentEnd="true"
        android:layout_marginEnd="79dp"
        android:text="@string/defaultMethod" />

</RelativeLayout>
Exercise 2
When a donation is accepted, set the amount on screen to 0 (in both picker and text field).
Solution
Add these two lines at the end of Donate.donateButtonPressed()
    amountText.setText("");
    amountPicker.setValue(0);
Exercise 3
When you navigate from the Donate activity to reports, there will be no menu available. Bring in a menu, with two options 'Settings' and 'Donate' - Donate should bring you back to the donate screen.
Solution
Introduce a new string constant into strings.xml:
<string name="menuDonate">Donate</string>Then a new menu - menu_report.xml - in the correct res folder:
<?xml version="1.0" encoding="utf-8"?>
<menu xmlns:android="http://schemas.android.com/apk/res/android">

    <item android:id="@+id/menuSettings"
        android:title="@string/menuSettings"
        android:orderInCategory="100"/>

    <item android:id="@+id/menuDonate"
        android:title="@string/menuDonate"
        android:orderInCategory="100"/>

</menu>
The report activity will then require the following two methods.
- Warning: When introducing these methods into Report.java ensure you locate them within the Report class, not within the DonationAdapter class that you may have chosen to locate in the same compilation unit (the file Report.java).
    @Override
    public boolean onCreateOptionsMenu(Menu menu) {
        getMenuInflater().inflate(R.menu.menu_report, menu);
        return true;
    }

    @Override
    public boolean onOptionsItemSelected(MenuItem item){
        switch (item.getItemId())
        {
            case R.id.menuDonate: startActivity(new Intent(this, Donate.class));
                break;
            case R.id.menuSettings:  Toast.makeText(this, "Settings Selected", Toast.LENGTH_SHORT).show();
                break;
        }
        return true;
    }
These imports are required:
import android.content.Intent;
import android.view.MenuItem;
import android.view.Menu;
If you experiment and subclass Activity rather than AppCompatActivity, you will note that the menu may not appear. The AppCompat library implements a 'backport' of the menu bar to older editions.
Exercise 4: Welcome
Introduce a new welcome screen - which should display a greeting + give the user 2 options (as simple buttons)
- Signup
- Login
When Login is pressed, the app should take you directly to the Donate activity (for the moment).
This is the new layout:
Filename: activity_welcome.xml
<?xml version="1.0" encoding="utf-8"?>
<android.support.constraint.ConstraintLayout xmlns:android="http://schemas.android.com/apk/res/android"
    xmlns:app="http://schemas.android.com/apk/res-auto"
    xmlns:tools="http://schemas.android.com/tools"
    android:orientation="vertical"
    android:layout_width="match_parent"
    android:layout_height="match_parent">

    <Button
        android:id="@+id/welcomeLogin"
        android:layout_width="wrap_content"
        android:layout_height="wrap_content"
        android:layout_marginTop="180dp"
        android:text="@string/welcomeLogin"
        app:layout_constraintLeft_toLeftOf="parent"
        app:layout_constraintRight_toRightOf="parent"
        app:layout_constraintTop_toTopOf="parent" />

    <Button
        android:id="@+id/welcomeSignup"
        android:layout_width="wrap_content"
        android:layout_height="wrap_content"
        android:layout_marginTop="32dp"
        android:text="@string/welcomeSignup"
        app:layout_constraintLeft_toLeftOf="parent"
        app:layout_constraintRight_toRightOf="parent"
        app:layout_constraintTop_toBottomOf="@+id/welcomeLogin" />
</android.support.constraint.ConstraintLayout>
It requires these two strings in strings.xml:
    <string name="welcomeLogin">Login</string>
    <string name="welcomeSignup">Sign up</string>
Here is a minimal version of the activity:
package app.donation;

import app.donation.R;
import android.os.Bundle;
import android.support.v7.app.AppCompatActivity;

public class Welcome extends AppCompatActivity
{
  @Override
  public void onCreate(Bundle savedInstanceState)
  {
    super.onCreate(savedInstanceState);
    setContentView(R.layout.activity_welcome);
  }
}
(We continue to use AppCompatActivity)
We would like this to be the first activity to appear when the app is launched. This is configured in AndroidManifest.xml.
- Here is the existing manifest file:
<?xml version="1.0" encoding="utf-8"?>
<manifest xmlns:android="http://schemas.android.com/apk/res/android"
    package="app.donation">

    <application
        android:allowBackup="true"
        android:icon="@mipmap/ic_launcher"
        android:label="@string/app_name"
        android:theme="@style/AppTheme"
        android:name="app.donation.DonationApp">
        <activity
            android:name="app.donation.Donate"
            android:label="@string/app_name" >
            <intent-filter>
                <action android:name="android.intent.action.MAIN" />
                <category android:name="android.intent.category.LAUNCHER" />
            </intent-filter>
        </activity>
        <activity
            android:name="app.donation.Report"
            android:label="@string/donateTitle" >
        </activity>
    </application>

</manifest>
In the above, you can see that "Donate" is the MAIN activity, and we have no entry for Welcome yet. Here is a revision to do what we want:
<?xml version="1.0" encoding="utf-8"?>
<manifest xmlns:android="http://schemas.android.com/apk/res/android"
    package="app.donation">

    <application
        android:allowBackup="true"
        android:icon="@mipmap/ic_launcher"
        android:label="@string/app_name"
        android:supportsRtl="true"
        android:theme="@style/AppTheme"
        android:name="app.donation.DonationApp">

        <activity android:name="app.donation.Welcome"
                  android:label="@string/donateTitle">
            <intent-filter>
                <action android:name="android.intent.action.MAIN" />
                <category android:name="android.intent.category.LAUNCHER" />
            </intent-filter>
        </activity>

        <activity android:name="app.donation.Report"
            android:label="@string/donateTitle">
        </activity>

        <activity android:name="app.donation.Donate"
            android:label="@string/donateTitle">
        </activity>

    </application>

</manifest>
We have three activities - with Welcome denoted as the Main via these attributes:
           <intent-filter>
                <action android:name="android.intent.action.MAIN" />
                <category android:name="android.intent.category.LAUNCHER" />
            </intent-filter>
Notice that we have 'donateTitle' as the Label for several activities i.e. they are currently set to:
android:label="@string/donateTitle" >Perhaps we should change them now to:
android:label="@string/app_name" >However, it may make sense to have a different label for each activity as you evolve the app.
Invoking the Donate Activity from Login Button
We need an event handler for the Login button.
- Edit activity_welcome.xml and introduce a new field for the login button:
android:onClick="loginPressed" <Button
android:id="@+id/welcomeLogin"
android:layout_width="wrap_content"
android:layout_height="wrap_content"
android:layout_marginTop="180dp"
android:text="@string/welcomeLogin"
android:onClick="loginPressed"
app:layout_constraintLeft_toLeftOf="parent"
app:layout_constraintRight_toRightOf="parent"
app:layout_constraintTop_toTopOf="parent" />You will notice that the editor may recognize that you do not have any method called loginPressed in the Welcome class yet.
Bring in the method into Welcome class now:
  public void loginPressed (View view)
  {
    Toast toast = Toast.makeText(this, "Login Pressed!", Toast.LENGTH_SHORT);
    toast.show();
  }
These import statements are necessary:
import android.view.View;
import android.widget.Toast;
Test all of this now and make sure the toast message appears.
Finally, replace the loginPressed method implementation with the code to actually start the donate activity:
startActivity (new Intent(this, Donate.class));Import the Intent class and delete the import for Toast which is no longer needed here:
import android.content.Intent;Launch the app again, press Login: the Donation view should open.
Invoking the Donate Activity from Signup Button
Repeat the same process for the Signup Button
activity_welcome.xml
    <Button
        android:id="@+id/welcomeSignup"
        android:layout_width="wrap_content"
        android:layout_height="wrap_content"
        android:layout_marginTop="32dp"
        android:text="@string/welcomeSignup"
        android:onClick="signupPressed"
        app:layout_constraintLeft_toLeftOf="parent"
        app:layout_constraintRight_toRightOf="parent"
        app:layout_constraintTop_toBottomOf="@+id/welcomeLogin" />
Welcome.java
    public void signupPressed(View view) {
        startActivity(new Intent(this, Donate.class));
    }
Launch the app and test that the Donate Activity is launched from the SignUp button.
This completes exercise 4.
Exercise 5 - Part 1 Signup Layout
Introduce a Signup Activity, which should present the user with:
- First Name
- Last Name
Password
a 'Register' button.
Pressing Register should take you directly to "Donate" activity.
Also, refactor the Welcome screen such that the 'Sign up' button takes you to this, the sign up, screen.
Solution
In the Exercise 4 we created and activity by separately creating layout and a class, and building each from scratch. This time we will use the create activity wizard. In doing so, keep a close eye the files the wizard generates or modifies.
Select the app.activities package, and select "File->New->Other" ... and follow the following entries:
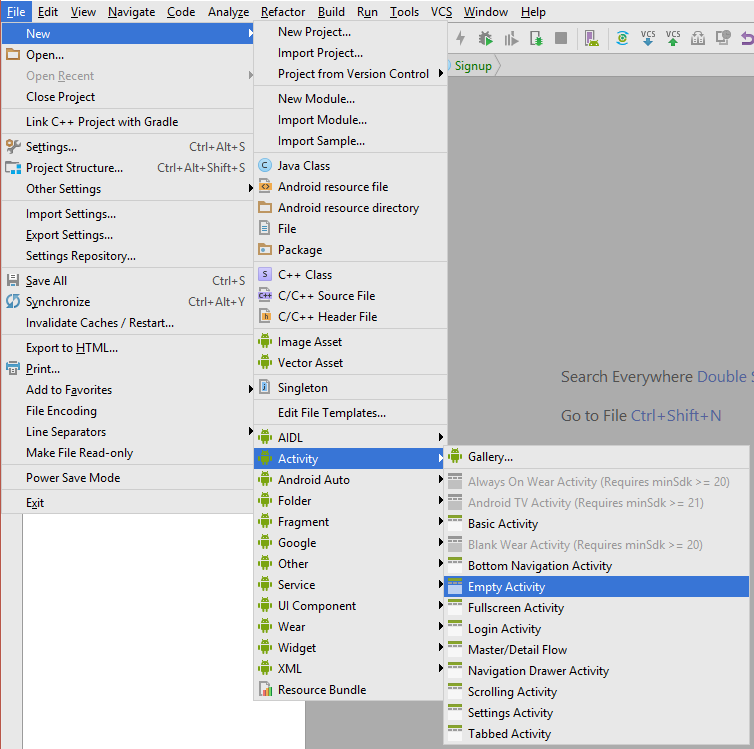
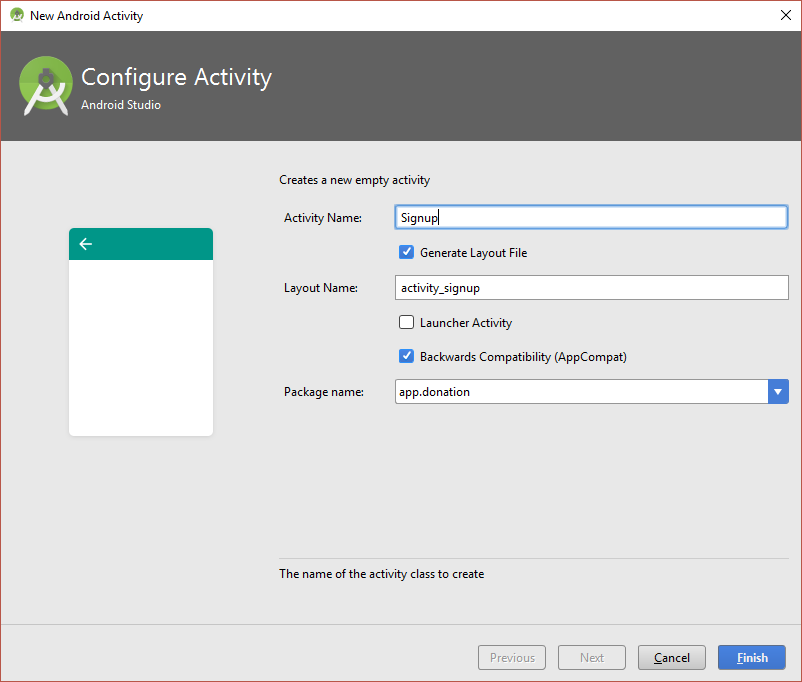
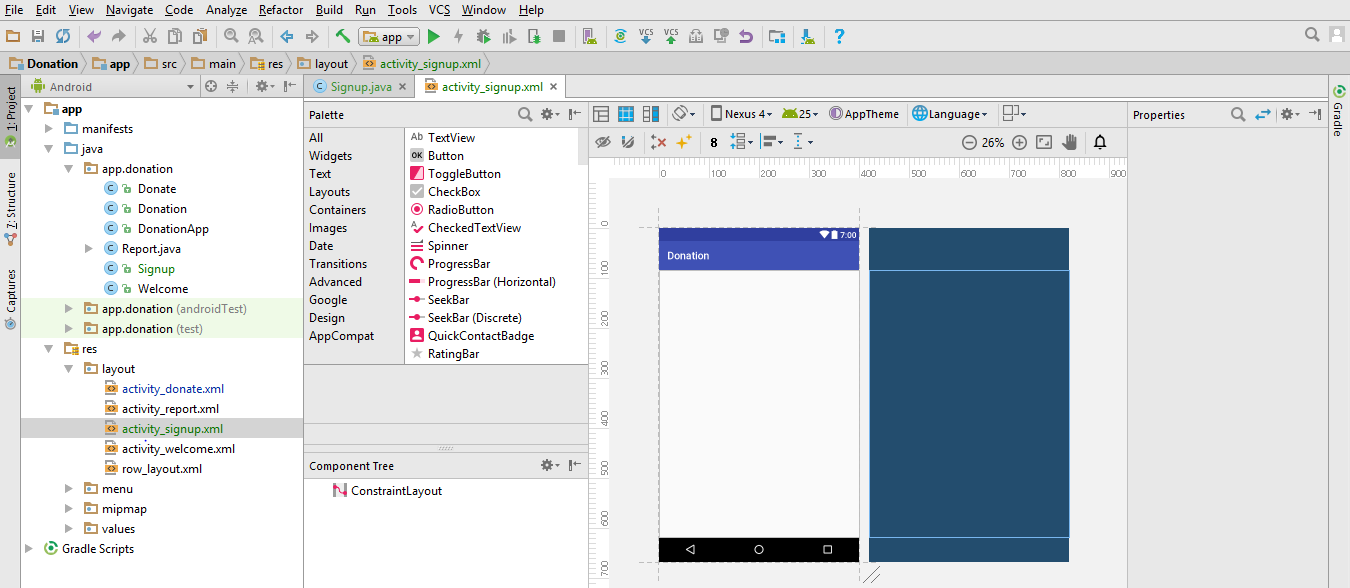

Open the layout designer, and design a screen (activity_signup.xml) to look like Figure 7 below.
Note: when placing the email on the canvas, select "E-mail" from the 'Text Widgets' palette. Likewise for the password, select the "Password" widget. The names are "Plain Text".
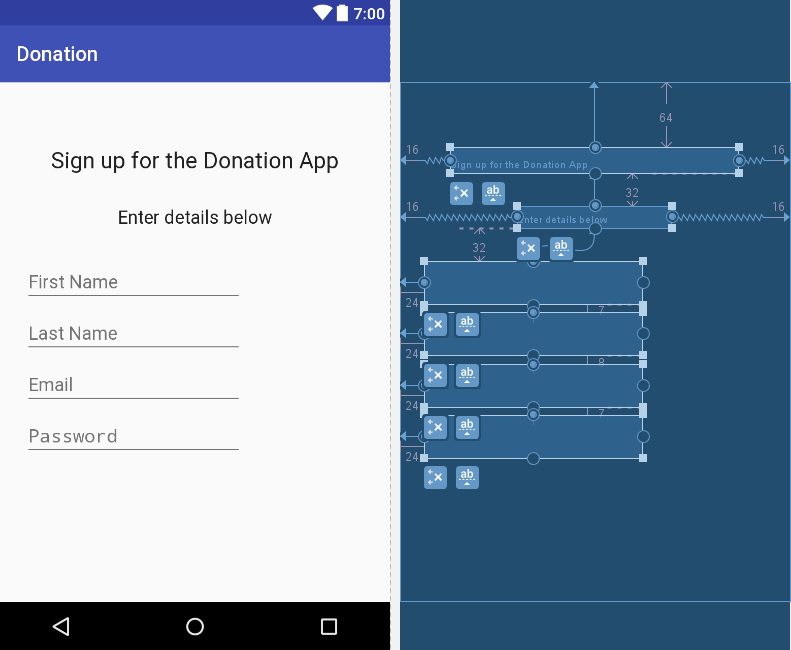
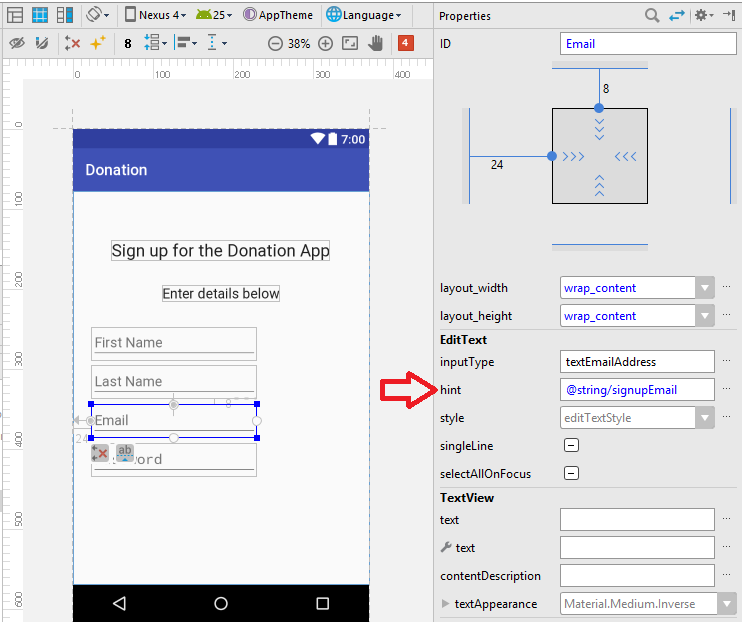
Note that we also don't have a 'label' for each of the fields (like we would have in a web app), but rather set a 'hint'. This can be set in the Properties window as shown in Figure 8.
This is the generated layout so far:
<?xml version="1.0" encoding="utf-8"?>
<android.support.constraint.ConstraintLayout xmlns:android="http://schemas.android.com/apk/res/android"
    xmlns:app="http://schemas.android.com/apk/res-auto"
    xmlns:tools="http://schemas.android.com/tools"
    android:layout_width="match_parent"
    android:layout_height="match_parent"
    tools:context="app.donation.Signup">

    <TextView
        android:id="@+id/signupTitle"
        android:layout_width="wrap_content"
        android:layout_height="wrap_content"
        android:text="@string/signupTitle"
        android:textAppearance="@android:style/TextAppearance.Large"
        android:layout_marginLeft="16dp"
        app:layout_constraintLeft_toLeftOf="parent"
        android:layout_marginRight="16dp"
        app:layout_constraintRight_toRightOf="parent"
        app:layout_constraintTop_toTopOf="parent"
        android:layout_marginTop="64dp" />

    <TextView
        android:id="@+id/signupSubtitle"
        android:layout_width="wrap_content"
        android:layout_height="wrap_content"
        android:layout_marginLeft="16dp"
        android:layout_marginRight="16dp"
        android:text="@string/signupSubtitle"
        android:textAppearance="@android:style/TextAppearance.Medium"
        app:layout_constraintLeft_toLeftOf="parent"
        app:layout_constraintRight_toRightOf="parent"
        android:layout_marginTop="32dp"
        app:layout_constraintTop_toBottomOf="@+id/signupTitle" />

    <EditText
        android:id="@+id/firstName"
        android:layout_width="wrap_content"
        android:layout_height="wrap_content"
        android:layout_marginLeft="24dp"
        android:layout_marginTop="32dp"
        android:ems="10"
        android:hint="@string/signupFirstName"
        android:inputType="textPersonName"
        app:layout_constraintLeft_toLeftOf="parent"
        app:layout_constraintTop_toBottomOf="@+id/signupSubtitle" />

    <EditText
        android:id="@+id/lastName"
        android:layout_width="wrap_content"
        android:layout_height="wrap_content"
        android:layout_marginLeft="24dp"
        android:layout_marginTop="8dp"
        android:ems="10"
        android:hint="@string/signupLastName"
        android:inputType="textPersonName"
        app:layout_constraintLeft_toLeftOf="parent"
        app:layout_constraintTop_toBottomOf="@+id/firstName" />

    <EditText
        android:id="@+id/Email"
        android:layout_width="wrap_content"
        android:layout_height="wrap_content"
        android:layout_marginLeft="24dp"
        android:layout_marginTop="8dp"
        android:ems="10"
        android:hint="@string/signupEmail"
        android:inputType="textEmailAddress"
        app:layout_constraintLeft_toLeftOf="parent"
        app:layout_constraintTop_toBottomOf="@+id/lastName" />

    <EditText
        android:id="@+id/Password"
        android:layout_width="wrap_content"
        android:layout_height="wrap_content"
        android:layout_marginLeft="24dp"
        android:layout_marginTop="8dp"
        android:ems="10"
        android:hint="@string/signupPassword"
        android:inputType="textPassword"
        app:layout_constraintLeft_toLeftOf="parent"
        app:layout_constraintTop_toBottomOf="@+id/Email" />

</android.support.constraint.ConstraintLayout>
and strings.xml has these supporting definitions:
    <string name="signupTitle">Sign up for the Donation App</string>
    <string name="signupSubtitle">Enter details below</string>
    <string name="signupFirstName">First Name</string>
    <string name="signupLastName">Last Name</string>
    <string name="signupEmail">Email</string>
    <string name="signupPassword">Password</string>
The email and password ids are exceptionally "Email" and "Password" (leading upper case letter). This is to avoid conflict with built in ids.
The last artefact that we need to place on our layout is the Register button (bottom, centre).
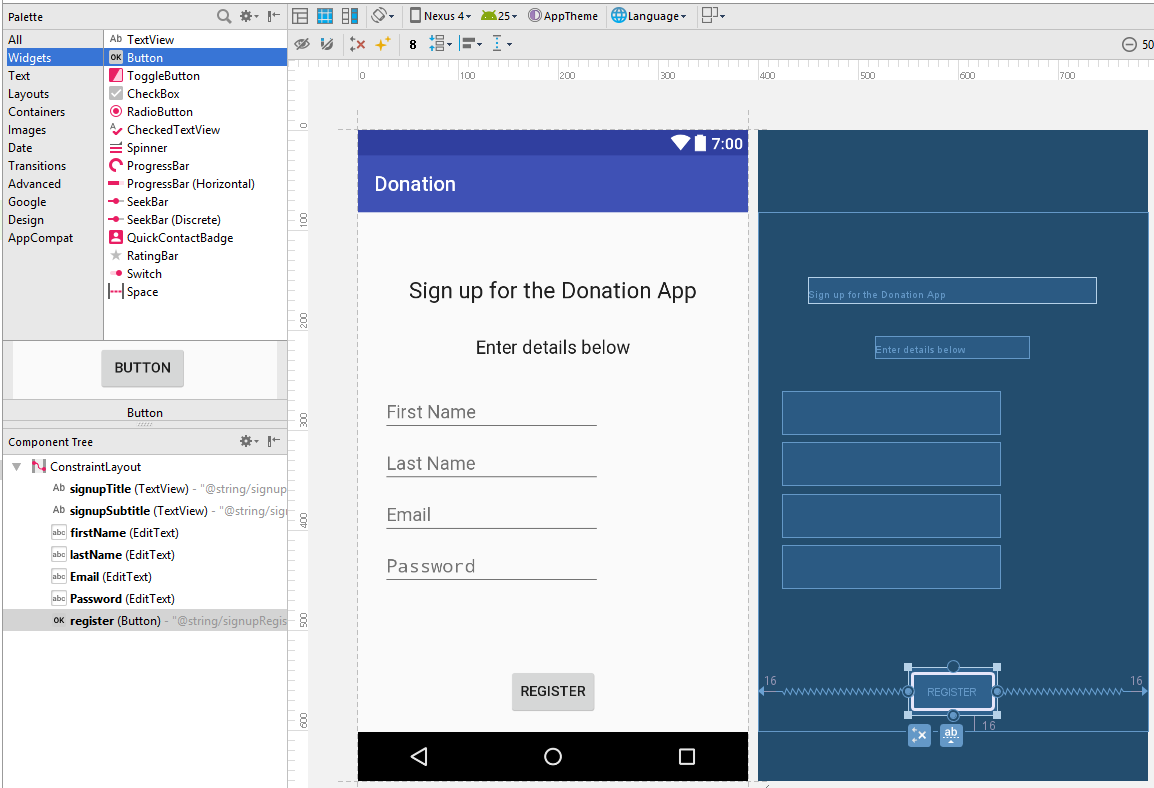
The additional xml code in the layout file:
    <Button
        android:id="@+id/register"
        android:layout_width="wrap_content"
        android:layout_height="wrap_content"
        android:layout_marginBottom="16dp"
        android:layout_marginLeft="16dp"
        android:layout_marginRight="16dp"
        android:text="@string/signupRegister"
        app:layout_constraintBottom_toBottomOf="parent"
        app:layout_constraintLeft_toLeftOf="parent"
        app:layout_constraintRight_toRightOf="parent" />
and the supporting String:
<string name="signupRegister">Register</string>Exercise 5 - Part 2 Signup Activity Class
(continued)
Pressing Register should take you directly to "Donate" activity. Also, refactor the Welcome screen such that the 'signup' button takes you to this screen (the Donate activity).
Solution
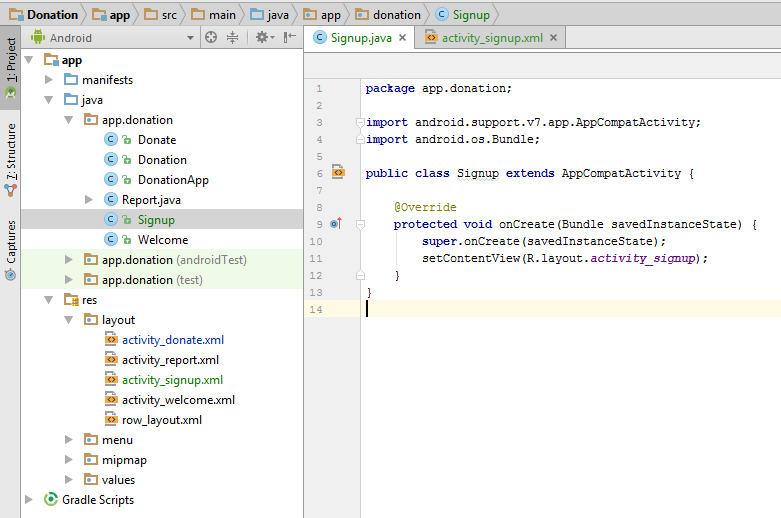
The previous step generated this Activity class:
package app.donation;

import android.support.v7.app.AppCompatActivity;
import android.os.Bundle;

public class Signup extends AppCompatActivity {

    @Override
    protected void onCreate(Bundle savedInstanceState) {
        super.onCreate(savedInstanceState);
        setContentView(R.layout.activity_signup);
    }
}
Set the event handler in the activity_signup.xml layout:
    <Button
        android:id="@+id/register"
        android:layout_width="wrap_content"
        android:layout_height="wrap_content"
        android:layout_marginBottom="16dp"
        android:layout_marginLeft="16dp"
        android:layout_marginRight="16dp"
        android:text="@string/signupRegister"
        android:onClick="signupPressed"
        app:layout_constraintBottom_toBottomOf="parent"
        app:layout_constraintLeft_toLeftOf="parent"
        app:layout_constraintRight_toRightOf="parent" />
and implement the event handler:
  public void signupPressed (View view)
  {
    startActivity (new Intent(this, Donate.class));
  }
We need to wire up the 'Signup' button from the welcome screen to take us to the signup activity.
Open the actiovity_welcome.xml layout; you should already have signupPressed as the click handler:
    <Button
        android:id="@+id/welcomeSignup"
        android:layout_width="wrap_content"
        android:layout_height="wrap_content"
        android:layout_marginTop="32dp"
        android:text="@string/welcomeSignup"
        android:onClick="signupPressed"
        app:layout_constraintLeft_toLeftOf="parent"
        app:layout_constraintRight_toRightOf="parent"
        app:layout_constraintTop_toBottomOf="@+id/welcomeLogin" />
Now go to the Welcome class and the handler method should look similar to this:
    public void signupPressed(View view)
    {
        startActivity(new Intent(this, Donate.class));
    }
Instead of bringing the user to the Donate activity, we want them to go to the signup activity - implement this change in the handler:
  public void signupPressed (View view)
  {
    startActivity (new Intent(this, Signup.class));
  }
In your manifest file, make sure you have a similar entry to this:
    <activity
        android:name="app.donation.Signup"
        android:label="@string/app_name" />
Run the app now, and verify that the navigation operates as expected.
Also, try the 'back' button, and the menu button. Try various combination of these to see how it operates.
Exercise 6: Login
Introduce a Login activty, which should just look for
password
a 'Login' button
Pressing Login should take you directly to "Donate" activity.
Solution
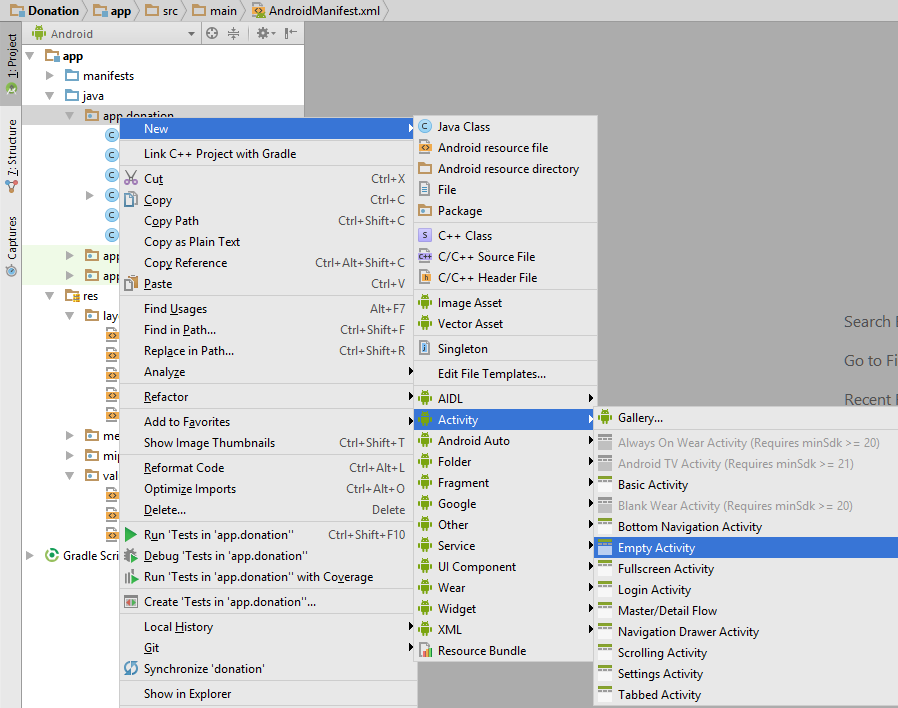
Create new activity using the 'Wizard' - called "Login". Do not select "Login" form the wizard, keep the activity 'Empty'. Ensure you select java/app/donation in the Android Tools Window before activating the wizard to ensure the new class is correctly located:
Also, ensure that Login is correctly referenced in the manifest file as follows:
        <activity
            android:name=".Login"
            android:label="@string/app_name"/>
Edit the layout, and design a screen to look like that shown in Figure 3 below.
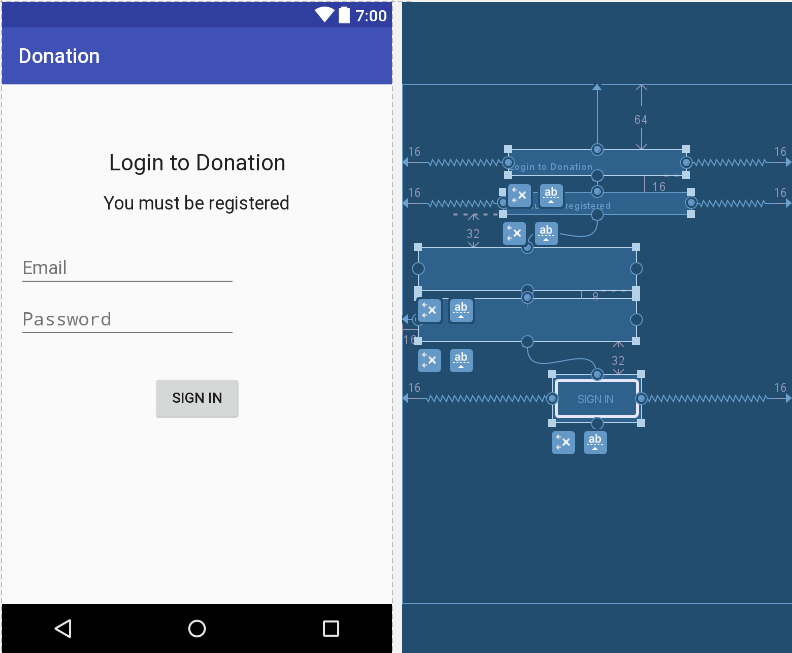
This is the layout that may be generated:
<?xml version="1.0" encoding="utf-8"?>
<android.support.constraint.ConstraintLayout xmlns:android="http://schemas.android.com/apk/res/android"
    xmlns:app="http://schemas.android.com/apk/res-auto"
    xmlns:tools="http://schemas.android.com/tools"
    android:layout_width="match_parent"
    android:layout_height="match_parent"
    tools:context="app.donation.Login">

    <TextView
        android:id="@+id/loginTitle"
        android:layout_width="wrap_content"
        android:layout_height="wrap_content"
        android:text="@string/loginTitle"
        android:textAppearance="@android:style/TextAppearance.Large"
        android:layout_marginLeft="16dp"
        app:layout_constraintLeft_toLeftOf="parent"
        android:layout_marginRight="16dp"
        app:layout_constraintRight_toRightOf="parent"
        app:layout_constraintTop_toTopOf="parent"
        android:layout_marginTop="64dp"
        app:layout_constraintHorizontal_bias="0.502" />

    <TextView
        android:id="@+id/loginSubtitle"
        android:layout_width="wrap_content"
        android:layout_height="wrap_content"
        android:layout_marginLeft="16dp"
        android:layout_marginRight="16dp"
        android:layout_marginTop="16dp"
        android:text="@string/loginSubtitle"
        android:textAppearance="@android:style/TextAppearance.Medium"
        app:layout_constraintLeft_toLeftOf="parent"
        app:layout_constraintRight_toRightOf="parent"
        app:layout_constraintTop_toBottomOf="@+id/loginTitle"
        app:layout_constraintHorizontal_bias="0.502" />

    <EditText
        android:id="@+id/Email"
        android:layout_width="wrap_content"
        android:layout_height="wrap_content"
        android:ems="10"
        android:hint="@string/loginEmail"
        android:inputType="textEmailAddress"
        android:layout_marginTop="32dp"
        app:layout_constraintTop_toBottomOf="@+id/loginSubtitle"
        android:layout_marginLeft="16dp"
        app:layout_constraintLeft_toLeftOf="parent" />

    <EditText
        android:id="@+id/Password"
        android:layout_width="wrap_content"
        android:layout_height="wrap_content"
        android:ems="10"
        android:hint="@string/loginPassword"
        android:inputType="textPassword"
        android:layout_marginLeft="16dp"
        app:layout_constraintLeft_toLeftOf="parent"
        android:layout_marginTop="8dp"
        app:layout_constraintTop_toBottomOf="@+id/Email" />

    <Button
        android:id="@+id/login"
        android:layout_width="wrap_content"
        android:layout_height="wrap_content"
        android:layout_marginLeft="16dp"
        android:layout_marginRight="16dp"
        android:layout_marginTop="32dp"
        android:text="@string/loginSignIn"
        app:layout_constraintLeft_toLeftOf="parent"
        app:layout_constraintRight_toRightOf="parent"
        app:layout_constraintTop_toBottomOf="@+id/Password" />
</android.support.constraint.ConstraintLayout>
Add the supporting strings, removing Hello World default string:
    <string name="loginTitle">Login to Donation</string>
    <string name="loginSubtitle">You must be registered</string>
    <string name="loginEmail">Email</string>
    <string name="loginPassword">Password</string>
    <string name="loginSignIn">Sign In</string>
This is how we would like the class to be implemented:
package app.donation;

import android.content.Intent;
import android.support.v7.app.AppCompatActivity;
import android.os.Bundle;
import android.view.View;

public class Login extends AppCompatActivity {

    @Override
    protected void onCreate(Bundle savedInstanceState) {
        super.onCreate(savedInstanceState);
        setContentView(R.layout.activity_login);
    }

    public void signinPressed (View view)
    {
        startActivity (new Intent(this, Donate.class));
    }
}
Locate the button resource in the activity_login.xml resource:
    <Button
        android:id="@+id/login"
        android:layout_width="wrap_content"
        android:layout_height="wrap_content"
        android:layout_marginLeft="16dp"
        android:layout_marginRight="16dp"
        android:layout_marginTop="32dp"
        android:text="@string/loginSignIn"
        android:onClick="signinPressed"
        app:layout_constraintLeft_toLeftOf="parent"
        app:layout_constraintRight_toRightOf="parent"
        app:layout_constraintTop_toBottomOf="@+id/Password" />
.. and introduce the onClick handler (shown above).
Now, redirect the welcome screen to take the user to this screen when 'Login' is pressed.
Open Welcome.java:
  public void loginPressed (View view)
  {
    startActivity (new Intent(this, Login.class));
  }
And redirect the Signup screen to the Welcome screen once the Register button is pressed:
  public void signupPressed (View view)
  {
    startActivity (new Intent(this, Welcome.class));
  }
The navigation is a little tricky to get right - so verify that you can launch and follow from one screen to the next.
Exercise 7
Bring in a new menu option - 'logout'. It should take you to the welcome screen, and should be available from the donate and report activities.
Solution
Introduce a new string resource for the menu item in strings.xml:
<string name="menuLogout">Logout</string>In both menu_donate.xml and menu_report.xml (the menus), bring in a new option:
      <item
        android:id="@+id/menuLogout"
        android:orderInCategory="100"
        android:title="@string/menuLogout"/>
Run the app now, and verify that these options appear.
Then we need to implement the control flow. In the donate activity class:
    @Override
    public boolean onOptionsItemSelected(MenuItem item)
    {
        switch (item.getItemId())
        {
            case R.id.menuReport:   startActivity(new Intent(this, Report.class));
                break;
            case R.id.menuSettings: Toast.makeText(this, "Settings Selected", Toast.LENGTH_SHORT).show();
                break;
            case R.id.menuLogout:   startActivity(new Intent(this, Welcome.class));
                break;
        }
        return true;
    }
and Report:
    @Override
    public boolean onOptionsItemSelected(MenuItem item){
        switch (item.getItemId())
        {
            case R.id.menuDonate:   startActivity(new Intent(this, Donate.class));
                break;
            case R.id.menuSettings: Toast.makeText(this, "Settings Selected", Toast.LENGTH_SHORT).show();
                break;
            case R.id.menuLogout:   startActivity(new Intent(this, Welcome.class));
                break;
        }
        return true;
    }
Test this now.
Exercise 8
Introduce a 'User' into the models package to represent the user in the usual way. Maintain a list of Users in the DonationApp object. Whenever anyone registers, then create a new User object in this list.
Solution
Bring in this new class the project
package app.donation;

public class User {
    public String firstName;
    public String lastName;
    public String email;
    public String password;

    public User(String firstName, String lastName, String email, String password) {
        this.firstName = firstName;
        this.lastName = lastName;
        this.email = email;
        this.password = password;
    }
}
In DonationApp class, incorporate a new collection of Users as a member of the class:
public List <User> users = new ArrayList<User>();.. and a new method to add a user to this collection:
  public void newUser(User user)
  {
    users.add(user);
  }
Now in the Signup activity - we can retrieve the fields from the widgets, create a new User object and store it in the DonationApp object:
  public void signupPressed (View view)
  {
    TextView firstName = (TextView)  findViewById(R.id.firstName);
    TextView lastName  = (TextView)  findViewById(R.id.lastName);
    TextView email     = (TextView)  findViewById(R.id.Email);
    TextView password  = (TextView)  findViewById(R.id.Password);

    User user = new User (firstName.getText().toString(), lastName.getText().toString(), email.getText().toString(), password.getText().toString());

    DonationApp app = (DonationApp) getApplication();
    app.newUser(user);

    startActivity (new Intent(this, Welcome.class));
  }
}
Test this now.
Exercise 9
Implement the Login activity so that users are permitted to Donate only if they are registered (i.e. a matching email + password exists in the list of users maintained by DonationApp)
Solution
Here is a new method for DonationApp that will validate users :
  public boolean validUser (String email, String password)
  {
    for (User user : users)
    {
      if (user.email.equals(email) && user.password.equals(password))
      {
        return true;
      }
    }
    return false;
  }
Then we can check in Login activity that the entered details match a user:
  public void signinPressed (View view)
  {
    DonationApp app = (DonationApp) getApplication();

    TextView email     = (TextView)  findViewById(R.id.loginEmail);
    TextView password  = (TextView)  findViewById(R.id.loginPassword);

    if (app.validUser(email.getText().toString(), password.getText().toString()))
    {
      startActivity (new Intent(this, Donate.class));
    }
    else
    {
      Toast toast = Toast.makeText(this, "Invalid Credentials", Toast.LENGTH_SHORT);
      toast.show();
    }
  }
Run this now - and you should be able to only log in if the user has been registered correctly.
Converting to Constraint Layout
If you have any "RelativeLayout" layouts, convert them to "ConstraintLayout". There is a conversion function in Android Studio to do this for you.
Solution
To check if your layouts use RelativeLayout, open the xml and check the layout either in Text view or Design view (in the Component Tree panel).
If your layout is Relative, in Design view, right click on the RelativeLayout in your Component Tree panel and select the option to Convert to ConstraintLayout. When the window appears, accept the defaults.
Your layout will now be a ConstraintLayout. View your design in the BluePrint and make any changes to the layout you see fit (you might not need to make any).
Run your app to make sure all is ok.
Refactor Package Structure
Currently our project package structure looks like this:
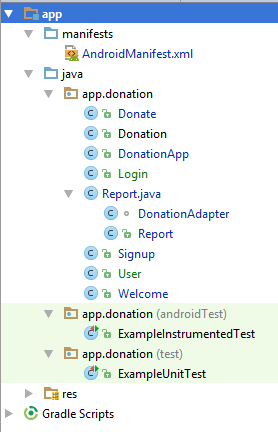
This is a reasonable number of classes in the app.donation package, but we might consider it a bit cluttered.
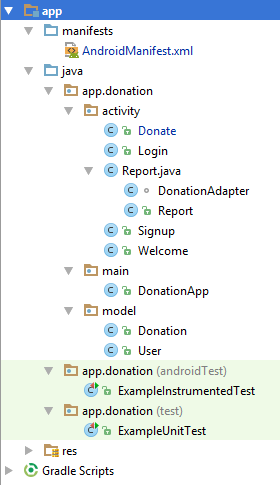
Here is a refactoring into three packages - this was achieved by:
1. Selecting app.donation and creating three new packages inside it as shown here:
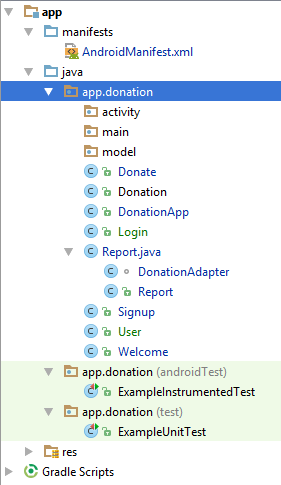
2. Drag and drop the classes into the appropriate packages
Proceed with caution!
If drag and drop seems to be unavailable - exit and restart Android Studio, as the refactoring options may be temporarily disabled.
Drag/drop/refactor will make sure all the imports are correctly inserted - including changing AndroidManifest.xml, however you may need to allow time for the refactoring to 'catch up' (it is making significant changes) before you press on to the next one.
This represents a cleaner structure, and a better foundation should we introduce more models and activities.
Solution
Project so far:
- Available to download from GitHub: donation-android-2017
Select Releases, followed by V3.0 to see periodic releases of V3.0 along with the completed V3.0 release.
If you have been checking in this lab as you go along, you may wish to save your work to github or bitbucket at this stage.
The simplest way of doing this is to first 'uncouple' the project from its current repo:
git remote rm originNote that this does not eliminate the commit history - it is all preserved intact locally in the .git folder. Now create a repo on one of the above services.
Once it is created, we associate this remote 'origin' with our local repo:
git remote add origin !!https url of repo!!And finally, we can push the repo:
git push -u origin --allTags should be pushed separately:
git push --tagsYou will be asked for your password for the remote service before the push will be executed.
Exercises
[1] Layouts
- Download the starting point from GitHub: donation-android-2017
Select Releases, followed by V3.0 and download the zip called:
android-linear-layout.starting.point.zipImport into Android Studio and run.
Exercise the menu options and note the layout differences in the various screens (activities).
Experiment by making changes and observing results to the following:
- android:gravity
- android:layout_weight
- android:layout_width="match_parent"
- android:layout_height="wrap_content"
[2] Add an activity to the above repo (android-linear-layout) named Report.
Provide menu access, following same pattern as existing app. This is a worthwhile exercise as it will give you experience in composing an activity, menu layout, adding string resources and configuring the manifest file.
As layout content add the solution in step 01 of Donation 03. This will result in the display of a single list entry in the activity.
[3] To obtain an idea of the extent and capability of TextView, briefly examine the official documentation page: TextView.
[4] Scan the official documentation for Layouts, in particular so as to obtain an overview of Linear, Relative, Constraint and ListView layouts, those that we shall mostly be using in this lab series.
[5] Setting listeners was introduced in the slide deck A First Android Application. Three different styles we mentioned. We have already seen how setting a listener explicitly in a resource file is implemented in the donation app. This is illustrated in the code extract here taken from the file res/layout/activity_donate.xml (donateButtonPressed).
    <Button
        android:id="@+id/donateButton"
        android:layout_width="88dp"
        android:layout_height="48dp"
        android:layout_marginBottom="24dp"
        android:text="@string/donateButton"
        app:layout_constraintBottom_toBottomOf="parent"
        android:onClick="donateButtonPressed"
        android:layout_marginLeft="16dp"
        app:layout_constraintLeft_toLeftOf="parent" />
Create two branches in your repo for android-linear-layout app, one named listener_1, the other listener_2.
- Checkout out listener_1 branch.
- Implement the listener for donationButtonPressed using an anonymous class.
- Test, add and commit to your repo and push the new branch to your remote.
- Now check out listener_2 branch.
- Implement the listener using the listener interface.
- Test, add and commit to your repo and push the new branch to your remote.